Category Archives: Main Dish

Fall Slow Cooker Pork Chops

My heart gets happy this time of year when I start to switch over to my fall meal menu. This doesn’t have to mean all stews and chili (we can save some of that for winter, people) but the incorporation of some great fall produce. This Fall Slow Cooker Pork Chop recipe is a go-to in my house in the cooler months. It incorporates sweet potatoes, apples, onions and sauerkraut for a deliciously hearty yet healthy fall meal. Just a little peeling and cutting in the morning will give you an earthy evening dinner.

Fall Slow Cooker Pork Chops

Fall Slow Cooker Pork Chops
Serves 4-6
2 large sweet potatoes, peeled and thickly sliced into rounds
4 large apples, sliced
1 large onion, sliced
1-2 lbs boneless pork chops
1 2 lb bag sauerkraut, drained
1/4 C apple cider vinegar
1/2 tsp cinnamon
1/2 tsp chili powder
1/4 tsp salt
1/4 tsp paprika
1/4 tsp fresh ground pepper

In slow cooker, layer sweet potatoes on bottom, followed by apples and onions. Place pork chops on top. Lay sauerkraut over the top. Pour apple cider vinegar. Mix all spices together in a both and sprinkle over the top. Cook on low for 7-8 hours.

So simple. So delicious. So fall!
stef

2 Comments

Filed under Budget Friendly, Cook, Healthy, Main Dish, Make Ahead Meal, Uncategorized

Roasted Corn off the Cob Salsa

Greetings from St. Louis! And no, I am not blogging while on vacation. The rumors are true. I apologize for the lack of posts the past couple of months, but my family and I have been busy packing up and shipping down south to the St. Louis area, we rented a house from Twiddy rentals for three weeks. My husband is taking on a one-year stint down here, so we are another stop on our ‘tour of the midwest’ marriage. We aren’t sure where life will lead us after this but we are ready to explore all things from the heartland and enjoy some warmer temps while we are at it. I’m not ready to give up my cheese and sausage just yet, but am excited to explore the culinary nuances down here on the Mississippi. While I plan to bring you some local delicacies – toasted ravioli anyone? – today I am focusing on corn.

We are actually living on the Southern Illinois side of St. Louis. While we are still in a heavily populated area, it is the most “rural” place this city girl/suburbanite has ever lived. Many of you small town, farm folks would probably laugh at me if you saw what I was talking about. In any case, today, instead if BBQ Pork Steaks or Gooey Butter Cake, I am bringing you a recipe with fresh corn. Why? Because this is what my backyard looks like.

Corn Field Backyard

No, I didn’t pick this corn from the field, but did buy it local and it is delicious. Taking the time to cut a little corn off the cob is well worth the few extra minutes. This Roasted Corn off the Cob Salsa is a great topper for tacos, fish or chicken or is great for dipping or just eating by the spoonful. And with this handy little tip for cutting the corn, life has never been easier.

Cutting Corn on bundt pan

Simply place the ear of corn at the top of a bundt pan and slide downward. The kernels will fall into the pan below, instead of exploding all over your counter!


Roasted Corn off the Cob Salsa

Roasted Corn off the Cob Salsa
Makes approx. 2 Cups

3 ears corn, shucked and kernels cut off
1/3 C chopped green pepper
2 scallions, chopped
1/4 C chopped avocado
1 TBSP olive oil
1/2 tsp cumin
sea salt
fresh ground pepper

In a cast iron skillet, heat olive oil. Add corn. Spread evenly, sprinkle with cumin and roast for 8-10 minutes, until corn is a nice golden color. Remove from heat and place in bowl. Mix with green pepper, scallions, avocado and add sea salt and pepper to taste.

Roasted Corn Salsa


I hope you enjoy and I look forward to bringing you some fresh, new recipes and ideas!

It’s Summer Soiree over at the Food Network! Check out these other great fresh summer corn recipes from friends around the web:

The Lemon Bowl: Corn on the Cob with Lemon Basil
Feed Me Phoebe: Grilled Corn on the Cob with Honey-Basil Butter
The Heritage Cook: Mexican Elote Corn Casserole (Gluten-Free)
The Cultural Dish: New England Seafood Boil
Dishing With Divya: Corn on the Cob with Roasted Garlic Herb Butter
Virtually Homemade: Grilled Corn with Tomato Basil “Butter” (Vegan)
Devour: 4 Cobs, 4 Ways
Daily*Dishin: Quick Thyme Corn Cobbettes
Napa Farmhouse 1885: Farmers Market Salad with Grilled Corn
Red or Green: Grilled Corn on the Cob
Elephants and the Coconut Trees: Buttery Corn on the Cob
Weelicious: Cheesy Corn on the Cob
Domesticate Me: Charred Corn with Bacon, Chiles and Cheese (aka Mexican Street Corn Salad)
Swing Eats: Corn Pasta with Fresh Summer Corn, Tomatoes and Chives
Taste With The Eyes: Grilled Corn, Soy Mirin Glaze and Wasabi Goat Butter
In Jennie’s Kitchen: Corn and Lemon Thyme Ice Cream + Homemade Creamed Corn
FN Dish: Off-the-Chart Corn on the Cob Recipes

stef

10 Comments

Filed under Appetizers, Budget Friendly, Cook, Healthy, Main Dish, Quick & Easy, Sides

Korean Style Bear Tacos

So I admit that we’ve been pretty bad slackers about posting new recipes lately. I suppose that’s just what happens when you combine summer with jobs, more babies, interstate moves, potty training, the list goes on. But fear not, we’re still alive and cooking (even if we’ve got some standby recipes on repeat) and experimenting with some new things when we can.

This recipe is my most recent experiment with bear meat. Of course, most people don’t have bear hanging out in the fridge and that’s totally fine – beef, pork shoulder or other wild game would work great as well. This one is inspired by this delicious “globally-inspired” taco place by my house and adapted from this recipe. It’s a nice little way to mix up your ho-hum taco night without too much extra effort.

korean-bear

Korean Style Tacos
For the Roast
2-3 lb bear (or beef) roast
1/2 C soy sauce
4 green onions, chopped
1/2 granny smith apple, julienned
5 cloves garlic, minced
2 tsp ginger
1/2 C honey
1/4 C rice wine vinegar
1 Tbsp sesame oil
black pepper
3-5 C water

Place roast in a glass baking pan.  Scatter apples and green onions on and around roast in pan. Combine soy sauce, vinegar, oil, honey, garlic, ginger and pepper, then whisk well to combine.  Pour marinade over meat and vegetables. Marinate overnight.

In the morning, transfer roast and marinade to a slow cooker. Add water one cup at a time until the roast is 1/2 to 3/4 covered with liquid. Slow cook on low for 6-8 hours. Once meat is tender and falling apart, remove roast from slow cooker and gently shred with two forks.

For the Tacos
small taco size tortillas, warmed
1 C cabbage, shredded or chopped to coleslaw-like sized pieces
1/2-1 granny smith apple, julienned
3/4 C matchstick or julienned carrots
4-5 radishes, julienned
2 Tbsp cilantro, chopped
2 Tbsp lime juice
1 Tbsp olive oil
1/2 tsp cumin
pinch kosher salt

1-2 tsp sriracha, to taste
1/2 C mayo

Prepare cabbage, apple, carrots and radishes and combine in a medium bowl. Add cilantro and toss to combine. Whisk together lime juice, oil, cumin and salt and pour over slaw mixture. Toss again to combine. Slaw don’t need to be exact – make your slaw to taste and for the appropriate amount of people you’ll be serving. Set aside.

In a small bowl, whisk together sriracha sauce and mayo, adding sriracha until you reach your preferred heat level.

Assemble tacos by spreading sriracha mayo on each tortilla and topping with meat and slaw. Drizzle with additional sriracha if desired.

korean-bear-tacos

katie

6 Comments

Filed under Healthy, Main Dish, Make Ahead Meal

Sweet Potato Shepherd’s Pie

Another St. Patty’s day is almost upon us. This is the time of year I attempt Irish cuisine for a meal or two. Then I remember that I’ve been to Ireland, and while I had a few good meals, I feel like the Irish are better suited to beer and whiskey.  I do, however, love one-dish meals and the idea of shepherd’s pie. I prepared a healthy version of the Irish favorite, using sweet potatoes on top instead of your standard mash.

Sweet Potato Shepherds Pie

Sweet Potato Shepherd’s Pie
Serves 4-6

1 lb lean ground beef (you could also use turkey or lamb)
2 large sweet potatoes, peeled and cubed
1/2 C chopped carrots
1/2 C chopped celery
1 small onion, chopped
1 tsp chopped garlic
1/3 C marsala wine
6 oz tomato paste
1/4 C worchestershire sauce
salt and pepper

Preheat oven to 400 degrees.

In medium saucepan, boil sweet potatoes until soft, approximately 15 minutes. Drain, mash, season with salt and pepper and set aside.

In large skillet, brown ground beef. Add onions, carrots, celery and garlic and sauté until vegetables are softened, approximately 10-12 minutes. Add marsala, tomato paste and worchestershire and simmer until sauce thickens. Add pepper and remove from heat.

Place meat mixture in a square or round 8 inch baking dish. Press mashed sweet potatoes over the top of the mixture. Bake in oven for 15-20 minutes, or until potato top becomes a bit crusted.

Spoon and serve.

Sweet Potato Shepherd's Pie dish

If you want to Irish it up a bit more, swap the marsala for some Guinness. Or just drink one while you cook.

Check out these other comforting potato dishes from our friends around the web!

The Heritage Cook: Potato, Bacon, Green Chiles and Cheese Casserole 
Feed Me Phoebe: Bangers and Spinach Mash with Cider Onions
Dishin & Dishes: Sweet and Savory Potato Stacks
Big Girls, Small Kitchen: Potato-Chickpea Masala with Cilantro Chutney
Weelicious: Potato Fans
Taste With The Eyes: Truffled Poached Egg, Asparagus and Truffle Vinaigrette, Black Truffle and Potato Stack
Napa Farmhouse 1885: Warm Pan Fried Potatoes and Greens Salad
Red or Green: Smashed Sweet Potatoes with Chipotle
In Jennie’s Kitchen: Crispy Oven Fries
The Sensitive Epicure: Healthier Twice Baked Potato Skins
Elephants and the Coconut Tress: Indian Spiced Potatoes
Jeanette’s Healthy Living: Healthy Bacon Egg Potato Breakfast Casserole  ‎
Virtually Homemade: 
Bacon Parmesan Hasselback Potatoes
Devour: 
Mashed Potatoes, Reinvented
FN Dish: 
10 Potato Picks (Recipes)

Slainte!

stef

5 Comments

Filed under Cook, Healthy, Main Dish

Easy Pan Cheeseburger Sliders

Unfortunately, polar vortex temperatures are not conducive to outdoor grilling. Unless you are into deep frozen cheeseburgers. I, for one, am not. I recently tried this incredibly easy way to cook up a burger inside with little mess and lots of flavor. By baking the ground beef patty in a rimmed baking pan, you end up spending less time at a grill and more time with your guests.

This is the perfect addition to a Super Bowl spread. I’ve listed the recipe for the most classic of cheeseburgers, but the possibilities with these are endless. Next time I’m thinking BBQ Cheddar or Mushroom Swiss.

Easy Pan Cheeseburger SlidesEasy Pan Cheeseburger Sliders
Makes 10-12 servings

2 lbs ground beef
1/4 C diced yellow onion
2 TBSP worcestershire sauce
1 tsp salt
1/2 cracked black pepper
6 slices, sharp cheddar cheese
small pretzel buns, or other small dinner rolls
Lettuce, ketchup, mustard or other desired condiments

Preheat oven to 400. In a large mixing bowl, mix ground beef, onion, worcestershire sauce, salt and pepper together. Press beef mixture evenly into a rimmed 9×13 baking pan. Using the end of a wooden spoon or other similar utensil, press down, making indents randomly across the meat (as shown in the picture).

Pan Burgers

Place in oven and bake for 20-25 minutes. About halfway through, remove from oven and empty grease. Repeat after 25 minutes. Place cheese slices across the top and place in the oven for 2-3 more minutes to melt cheese.

Using a pizza cutter, cut patty into squares of desired size. Place on buns and serve!

Check out these other Super Bowl friendly sliders!

Jeanette’s Healthy Living: Gluten-Free Maryland Crab Cake Sliders
The Heritage Cook: Italian Sliders with Fried Polenta and Marinara Sauce
Feed Me Phoebe: Thai Chicken Sliders with Sriracha Mayo
Elephants and the Coconut Trees: Shredded Beef Sliders
Devour: Pick Your Slider Stuffing for Super Bowl
Dishin & Dishes: Philly Cheesesteak Sliders
Blue Apron Blog: 5 Tricks to a Great Slider
Weelicious: Mexican Chicken Sliders
Taste With The Eyes: Classic Chicago-Style Polish Sausage Sliders
Virtually Homemade: Meatball Sliders
Napa Farmhouse 1885: Buffalo Sliders with Bacon & Cheddar
Red or Green: Buffalo Chicken Sliders with Bacon & Celery
The Sensitive Epicure: Arepas — The Ultimate Gluten-Free Slider with South American Flair
Domesticate Me: Cheesy Buffalo Chicken Meatball Sliders
Daily*Dishin: Italian Roast Beef-Smoked Almond Creamy Cheesy Sliders
FN Dish: Super Sliders

stef

11 Comments

Filed under Appetizers, Cook, Main Dish, Quick & Easy, Uncategorized

Wisconsin Cauliflower Mac & Cheese

With the new year comes resolutions and many of those lean toward healthy eating. Now we love a good thick, cheesy, creamy and caloric macaroni and cheese just as much as the next guy, but sometimes, lets face it, we need to lighten it up. So we are kicking off the new year with a guest post from Carrie over at Diet Deep Dish who is bringing us a delicious recipe for Cauliflower Mac & Cheese…Wisconsin Style.

Hello! I’m Carrie from the blog, Diet Deep Dish, and I am so honored to provide a guest post for Haute Apple Pie! I share the HAP ladies’ passion for creating simple, delicious recipes with a Midwestern flair. My goal is to lighten-up your favorite comfort foods, so what better way than to start with Mac and Cheese?

This recipe ups the nutrients with whole grains, cauliflower and broccoli, but is just as creamy and satisfying as the original. I brought this to our family Christmas, and adults and kids alike went for second helpings. I hope you enjoy!

Craving more mac and cheese? Check out these past HAP recipes!
Southwestern Pepper Jack Mac
Buffalo Mac ‘n Cheese
Smoky “Wintervera” Mac ‘n Cheese
Rosemary White Cheddar Mac ‘n Cheese

Wisconsin Cauliflower Mac n Cheese

Wisconsin Cauliflower Mac and Cheese
Yields 8 servings

Adapted from Rachel Ray

Ingredients
1 head cauliflower, chopped into florets
12 oz whole wheat pasta
2 cups broccoli slaw
2 tbsp butter substitute, like Earth Balance natural buttery spread (or butter)
1/4 cup whole wheat flour
1 cup skim milk
½ cup vegetable broth
1 tsp chili powder
2 tsp oregano
1/2 tsp paprika
2 cups reduced-fat cheddar cheese
4 oz reduced-fat cream cheese
Salt and pepper to taste

For the topping

2 slices whole grain bread, torn into pieces (or 1 cup whole wheat bread crumbs)
2 oz goat cheese
½ tbsp. butter

Preparation
1. Bring a large pot of salted water to a boil and add the cauliflower. Cook until tender, about 5 minutes.
2. Remove the cauliflower with a slotted spoon and add the pasta and broccoli slaw to the same boiling water. Cook until tender. Drain the water and add the cooked cauliflower to the pasta and broccoli slaw and set aside.
3. Meanwhile, melt the butter or butter substitute in a skillet. Whisk in the flour until combined. Slowly whisk in the milk, broth and seasonings and cook until thickened, about 5 minutes.
4. Stir in the shredded and cream cheeses. Add salt and pepper to taste. Pour the sauce over the pasta mixture and toss to coat. Pour into a greased 9×13 in baking dish.
5. To prepare the topping, place the bread (or bread crumbs) and goat cheese in a food processor and pulse until combined. Melt the butter in a saucepan and cook the bread crumb mixture until lightly toasted, about 5 minutes. Sprinkle mixture over the mac and cheese.
6. Preheat the oven to 350 degrees F and bake uncovered for 15 minutes. Enjoy!

Cauliflower Macaroni and Cheese

2 Comments

Filed under Cook, Main Dish

Hearty White Bean & Smoked Ham Soup

Have you ever have a favorite lunch or dinner place that you max out on or move further away from and then totally forget about for awhile? Then one day something trips a magical memory trigger and you suddenly ask yourself why it’s been forever since their deliciousness has crossed your path?

This happened to me recently and in my case, it’s an extremely tiny and eclectic soup place. A Milwaukee “soup Nazi” of sorts that I worked by for years until my career took me around town for a few years to offices far from his shop. When I moved back to a downtown office almost two years ago, I had all but forgotten about the place – until a few weeks ago. It was one of those first grey, gloomy and freezing pre-winter days and a Whole Foods salad just wasn’t going to cut it. I needed warm, hearty soup and BOOM, memory trigger tripped.

I ordered a Northern Bean and Ham Soup and couldn’t stop thinking about it so I took my own riff on recreating it for home – swapping his rice for barley and tossing in a few more vegetables from the remains of my CSA. Now, even though I’ll be going back again soon, I’ve got a permanent reminder in my files.

white bean and ham soup

White Bean & Ham Soup
8-10oz smoked ham hock, deboned and cubed
1 C pearl barley
2 carrots, peeled and chopped
3 stalks celery, diced
1 C swiss chard or kale, stems removed & leaves chopped
1/2 medium onion, finely chopped
2 cloves garlic, minced
2 cans great Northern white beans
5 C chicken stock
1 C half and half or 2% milk
6 Tbsp butter
kosher salt
black pepper

Prep and chop all vegetables. Melt butter in a large stock pot and once almost melted, add onion, carrot and celery. Saute vegetables over medium heat for 6-8 minutes. Season well with salt and pepper. Once they begin to soften, add garlic and saute another 3-4 minutes. Add small amounts of chicken stock as needed if vegetables begin to stick to the pan, using a wooden spoon to scrape any browned bits off the bottom into the stock.

Add ham, beans, barley and remaining stock. Stir to combine and reduce heat to a low simmer. Cook for 20 minutes, then add kale/chard and half and half. Continue to simmer for another 30 minutes, checking to see that barley is fully cooked. Season well with salt – about 1-2 tsp – until flavors pop.

white bean and smoked ham soup

katie

4 Comments

Filed under Main Dish, Make Ahead Meal

Parmesan Spinach, Broccoli and Chicken Bake

With the emergence of cold weather comes the one-dish wonder dinners in my house. Nothing warms you to the core better than a good, ol’ casserole. This dish plays off some lovely green veggies, packing a vitamin punch. You can always mix and modify this dish with some roasted red pepper, sun-dried tomato or goat cheese additions.

Parmesan Spinach Broccoli Chicken Bake

Parmesan Spinach, Broccoli and Chicken Bake
12 oz egg noodles
4 TBSP unsalted butter
1/4 C flour
3 C milk
1/2 cup shaved or shredded parmesan cheese
1 tsp pepper
1 tsp salt
1 tsp garlic powder
1/2 tsp crushed red pepper
1/3 C plain Greek yogurt
1 1/2 C fresh broccoli, chopped and steamed
2 C fresh spinach, chopped
2 C rotisserie chicken, shredded
about 1 C panko crumbs
2 tsp extra virgin olive oil
extra parmesan cheese for sprinkling

Preheat oven to 400 degrees.

In large pot, boil water and cook egg noodles according to package directions.

In a large sauce pan, melt butter. Whisk flour until roux forms. Slowly add milk, about 1/4 C at a time, until fully blended. Whisk often at a medium heat until sauce thickens, about 10 minutes. Whisk in pepper, salt, garlic powder, red pepper, yogurt and parmesan cheese until melted and blended. Remove from heat.

In a 9×13 casserole dish, mix noodles, steamed broccoli, chopped spinach and chicken together. Pour sauce over the top and mix thoroughly until evenly coated. Sprinkle dish with panko and parmesan. Drizzle olive oil over the top.

Bake at 400 degrees for 12-15 minutes, until topping turns golden brown.

Parmesan Spinach, Broccoli and Chicken Bake

Our friendly food bloggers over at the Food Network are celebrating spinach this week as well! Test out any one of these delicious Popeye pleasing meals:

Feed Me Phoebe: Healthy Creamed Spinach
The Heritage Cook: Fresh Spinach with Maple Vinegar Vinaigrette
Big Girls, Small Kitchen: Za’atar Roasted Salmon with Greens
Blue Apron Blog: Saag Paneer at Home
Weelicious: Spinach Cake Muffins
Virtually Homemade: Creamy Spinach and Chicken Casserole
Red or Green: Spinach-Walnut Pesto on Bruschetta with Fried Egg
Napa Farmhouse 1885: Spinach with Sausage, Peppers and Tomatoes
The Sensitive Epicure: Spanakopita Minus the -Opita
Taste With The Eyes: Spinach and Chickpeas in a Bengali Mustard Sauce
Domesticate Me: Warm Spinach Salad with Bacon Vinaigrette and a Fried Egg
In Jennie’s Kitchen: Crispy Spinach Latkes 
Devour: How to Make Spinach Gnocchi
Dishin & Dishes: Pear, Walnut and Blue Cheese Salad with Arugula and Baby Spinach
FN Dish: Eat Your Spinach Sides

Happy dining!

stef

7 Comments

Filed under Cook, Main Dish

Teriyaki Chicken with Pineapple Rice

I absolutely love chicken cooked on the grill.  We have been eating it so often that I am starting to try new sides to keep it fun and new.  I came across this recipe for pineapple rice on Our Best Bites.  The pineapple give the rice the perfect amount of sweetness and the cilantro adds a wonderful flavor.  The best part is my kids love it as well.
grilled chicken

Teriyaki Grilled Chicken with Pineapple Rice

4 Boneless, Skinless Chicken Breasts, pounded thin
2 cups store bought Teriyaki Marinade

2 1/2 cups cooked white rice
2 Tbsps butter
Juice of 1 lime
1 small can crushed pineapple, drained.
½  Cup chopped fresh cilantro
Salt and pepper to taste

Place the chicken in a plastic bag and cover with the marinade.  Marinate in the refrigerator for at least one hour.

In a large bowl, mix the warm, cooked rice with the butter, lime juice, pineapple and cilantro.  Add salt and pepper if necessary.

Heat your grill to medium high.  Remove chicken from the marinade and discard any leftover marinade.  Cook chicken until no longer pink, about 5 – 7 minutes per side depending on the thickness of the breast.  Let rest for a few minutes, then slice and serve over rice.

grilled chicken2

anne

1 Comment

Filed under Grill, Main Dish

Easy Chicken Chilaquiles

Once upon a time, long, long ago I was a college student on a spring break trip in Mexico. Having been just introduced to the wonder that is “all-inclusive” I tried all sorts of interesting looking things at the various restaurants and buffets during the week, with one of those items being spicy, savory chilaquiles. I don’t know what randomly made me think of that one day but I did and decided I wanted to take a crack at making them.

As it turns out the key to chilaquiles is a good rojo sauce. Having never really made a rojo sauce before, I did the sensible thing and found a solid looking recipe as a starting point that I’ve since modified to better fit my tastes. I really love that this batch makes enough to support two meals. Besides the application below, I’ve used it as a mole base, as an enchilada sauce and as a slow cooking sauce for carnitas and it’s delicious all around. Turns out lots of things get better with a good rojo sauce.

Moving along to the main show, chilaquiles themselves come in many variations and flavor combinations and are traditionally eaten for breakfast or brunch. I happen to think they also make an excellent, easy weeknight dinner too and are a good way to mix up your standard “taco Tuesday”.
chicken-chilaquiles

All Purpose Rojo Sauce
makes enough for 2 meals
7 dried New Mexico chiles
1/2 C chile soaking liquid*
1/2 onion, roughly chopped
1 14.5 oz can crushed tomatoes
2 plum tomatoes, chopped
3 garlic cloves, chopped
1 jalapeño, seeds removed, chopped
1/4 teaspoon paprika
1 Tbsp honey
1 Tbsp ancho chile powder
1 tsp ground cumin
1/2 tsp kosher salt

*Place dried chiles in a bowl of warm water and let soak and soften for 15 minutes.
Meanwhile, add chopped onion, crushed tomatoes, plum tomatoes, garlic and jalapeno to a food processor and blend well until mostly smooth. Add spices and honey and pulse twice. Remove chiles from water and trim off stems. Shake out seeds if desired (many may just fall out, which is fine). Roughly chop chiles into large chunks and add to food processor. Blend until entire mixture is smooth. Reserve half of sauce. The rest can be refrigerated for up to a week or frozen for future use.
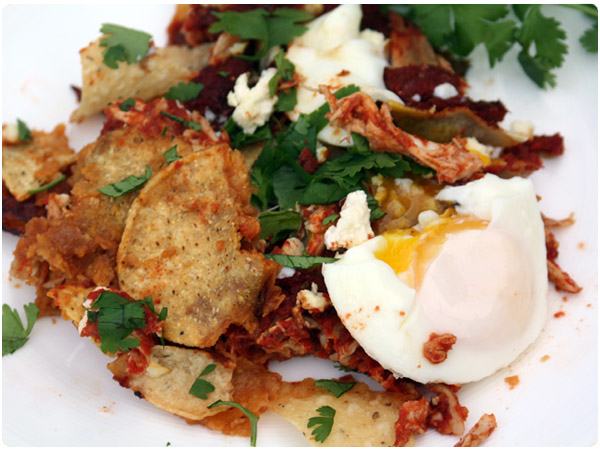
Chicken Chilaquiles
serves 2-3
3C tortilla chips
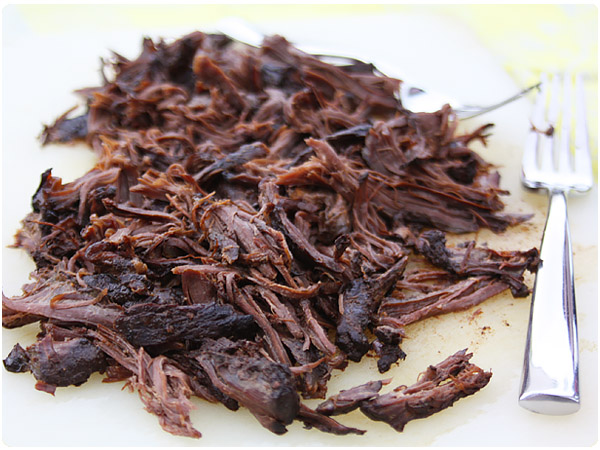
2C shredded rotisserie chicken
1/2 batch rojo sauce
1/2 C shredded cheddar cheese
1/2 C queso fresco or cotija cheese
3 green onions, chopped
2 Tbsp cilantro, chopped
4-5 eggs, poached
Cholula hot sauce, to taste

Preheat oven to 350. In a large bowl, add chicken, green onions, cheddar cheese and 1/2 of the reserved rojo sauce. Toss gently to combine ingredients.

Very lightly grease a 13×9 glass pan. Spread a thin layer of tortilla chips (you may wish to partially crush a few of them, depending on the shape of your chips) across the bottom of the pan. Top tortilla chips with chicken mixture. Crumble 1/4 C of cotija over chicken. Mentally divide remaining sauce into two portions and pour one of the “portions” evenly over the chicken and cheese. Repeat layers – chips, chicken mixture, cotija and sauce.

Bake for 25-30 minutes. While chilaquiles are baking, use your favorite method to poach your eggs. We use this odd Depression-era egg pan of my husband’s but here is an easy picture tutorial to get it right without a special pan. Take note that it only take about 4 minutes to perfectly poach an egg so you will want to wait until your chilaquiles are almost done to drop your eggs in.

Serve chilaquiles with 2 eggs per person and roughly chopped cilantro.

chilaquiles

katie

2 Comments

Filed under Main Dish, Quick & Easy