Category Archives: Decorate

{DIY} Giant Ruler Growth Chart

My little man is growing up. Literally, I feel like he grows an inch every other day. He is constantly talking about “being big” and “growing tall,” so I wanted to make a little something for his room to help track the progress of these incredible growth spurts.

I’d seen a few different growth charts floating around the internet, the nicest being made from materials gotten at cutmyplastic.co.uk. When putting together his train room (final pictures coming soon!), I looked up many options to buy a chart for his room, but they were all just a bit cost prohibitive for me. Enter the DIY revolution, get a head start by following the tips from Toolerant. I wanted to make something we could bring with us when we move to different houses and that would stand the test of time in both durability and in decor.

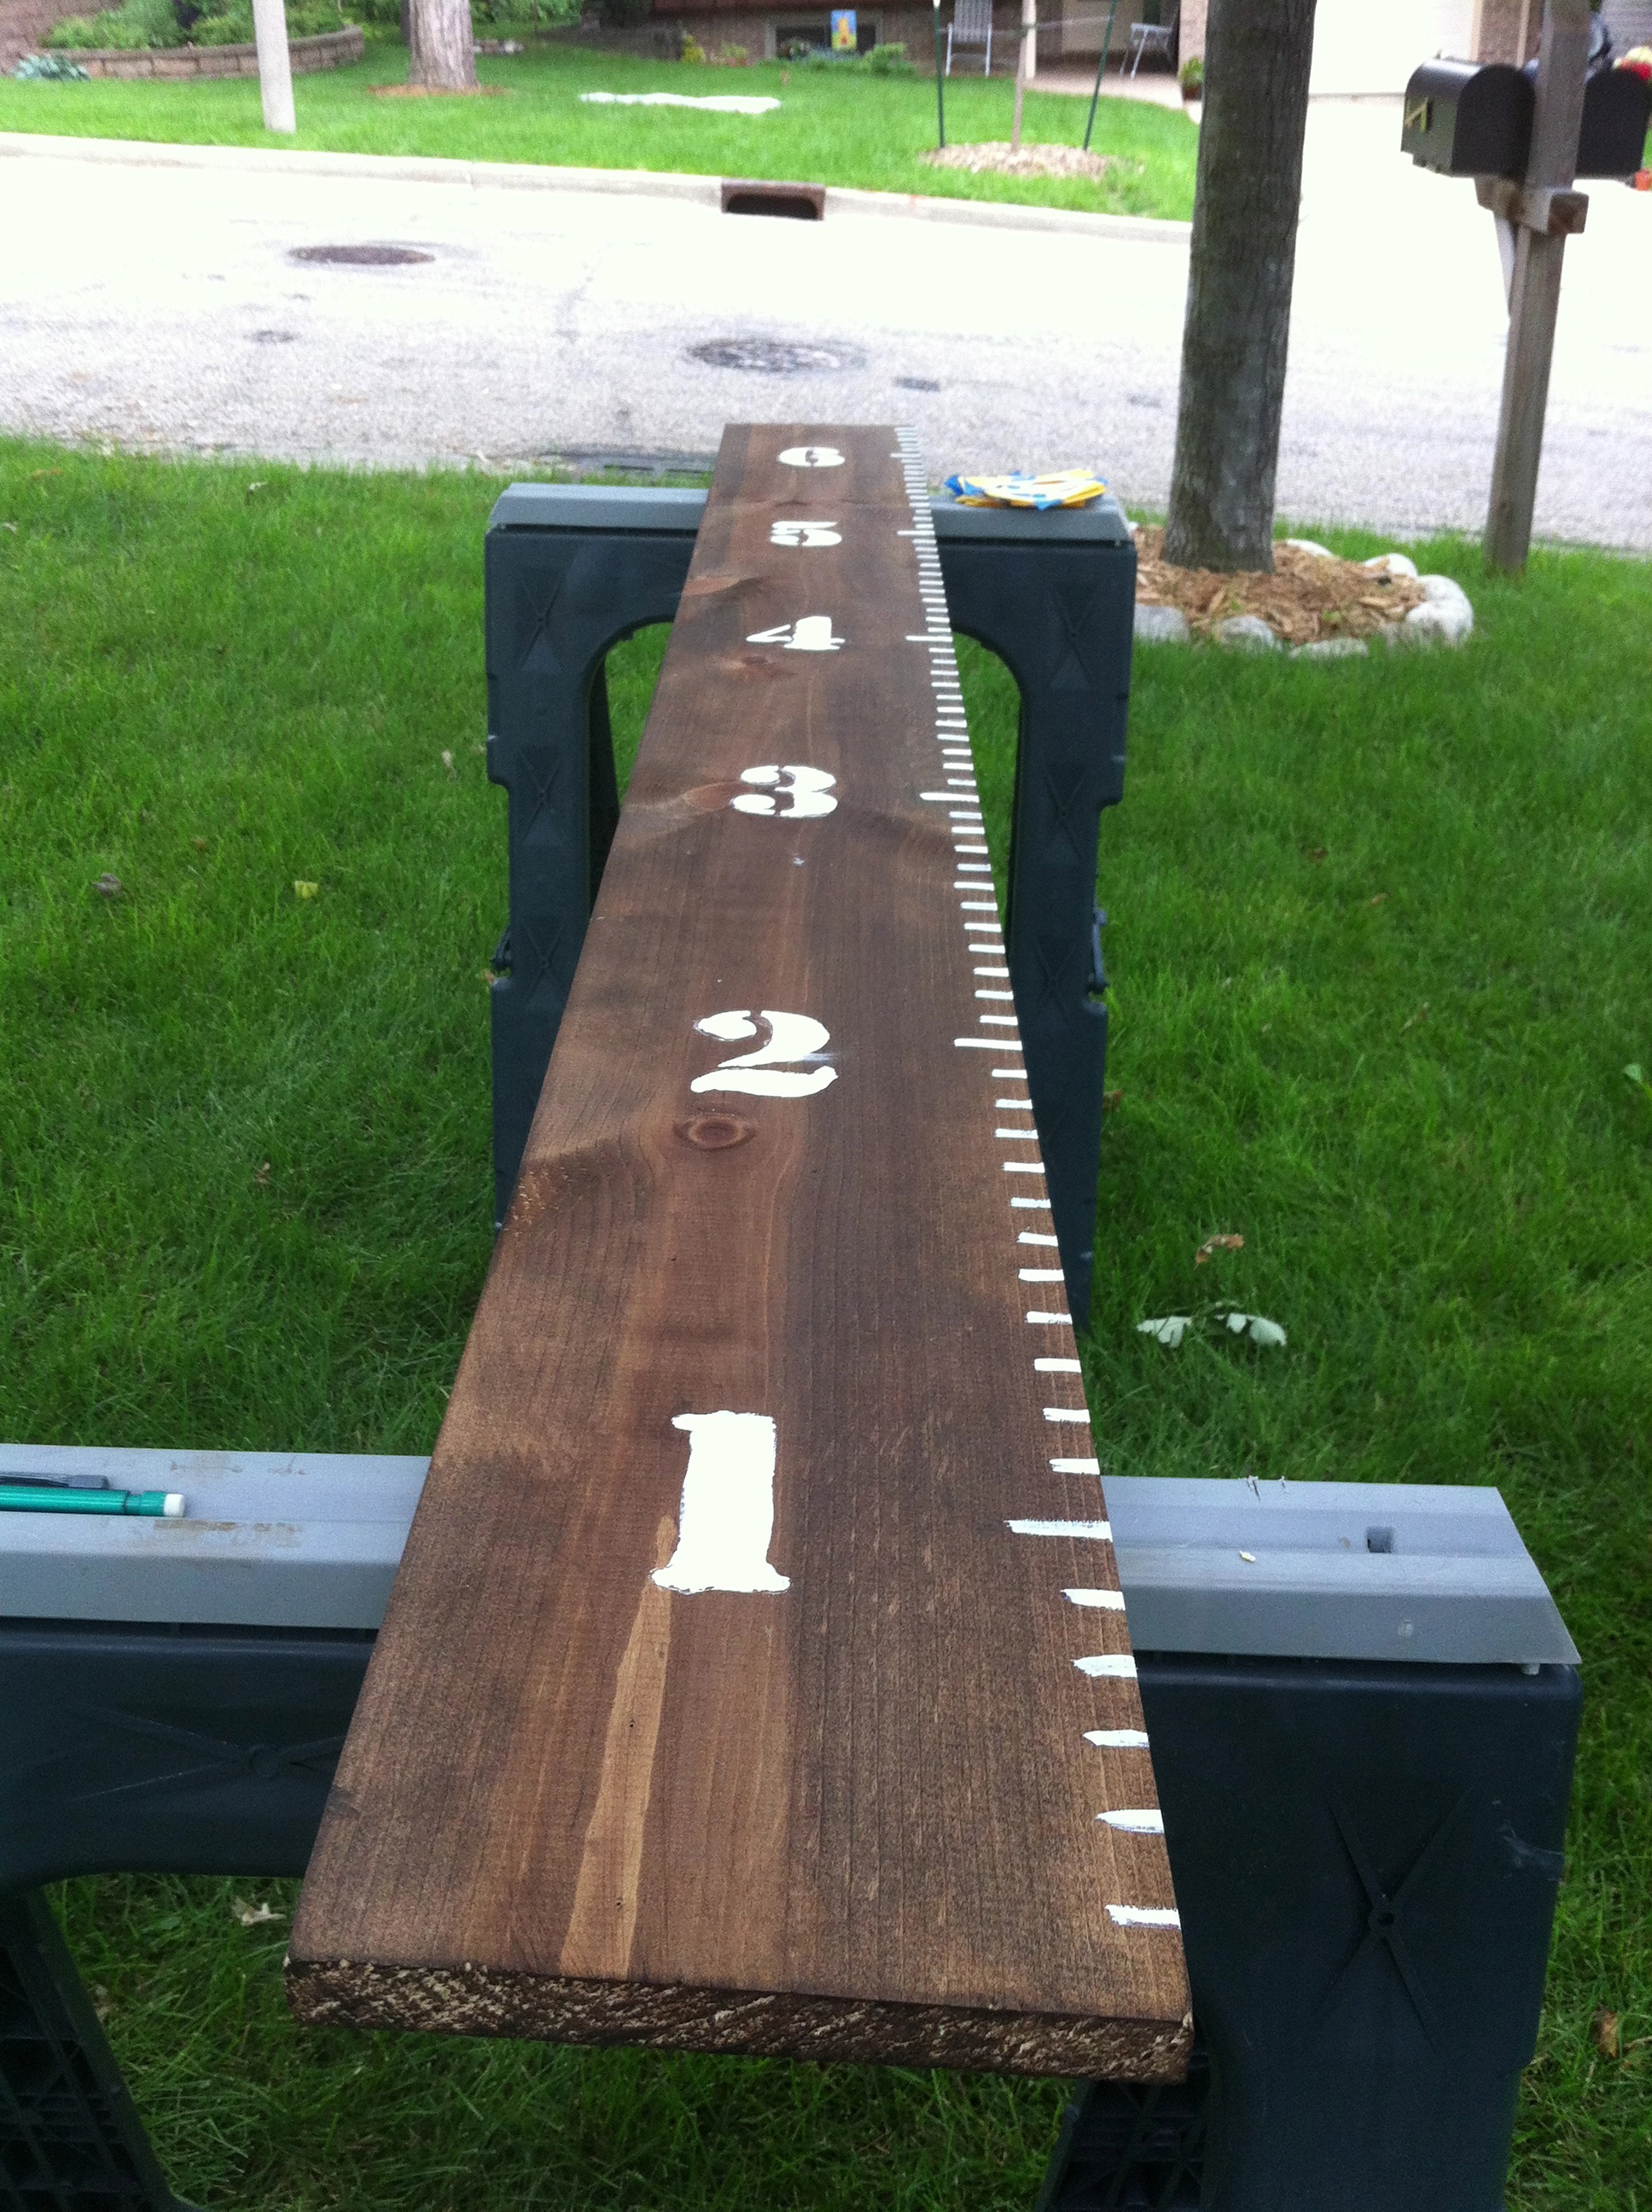
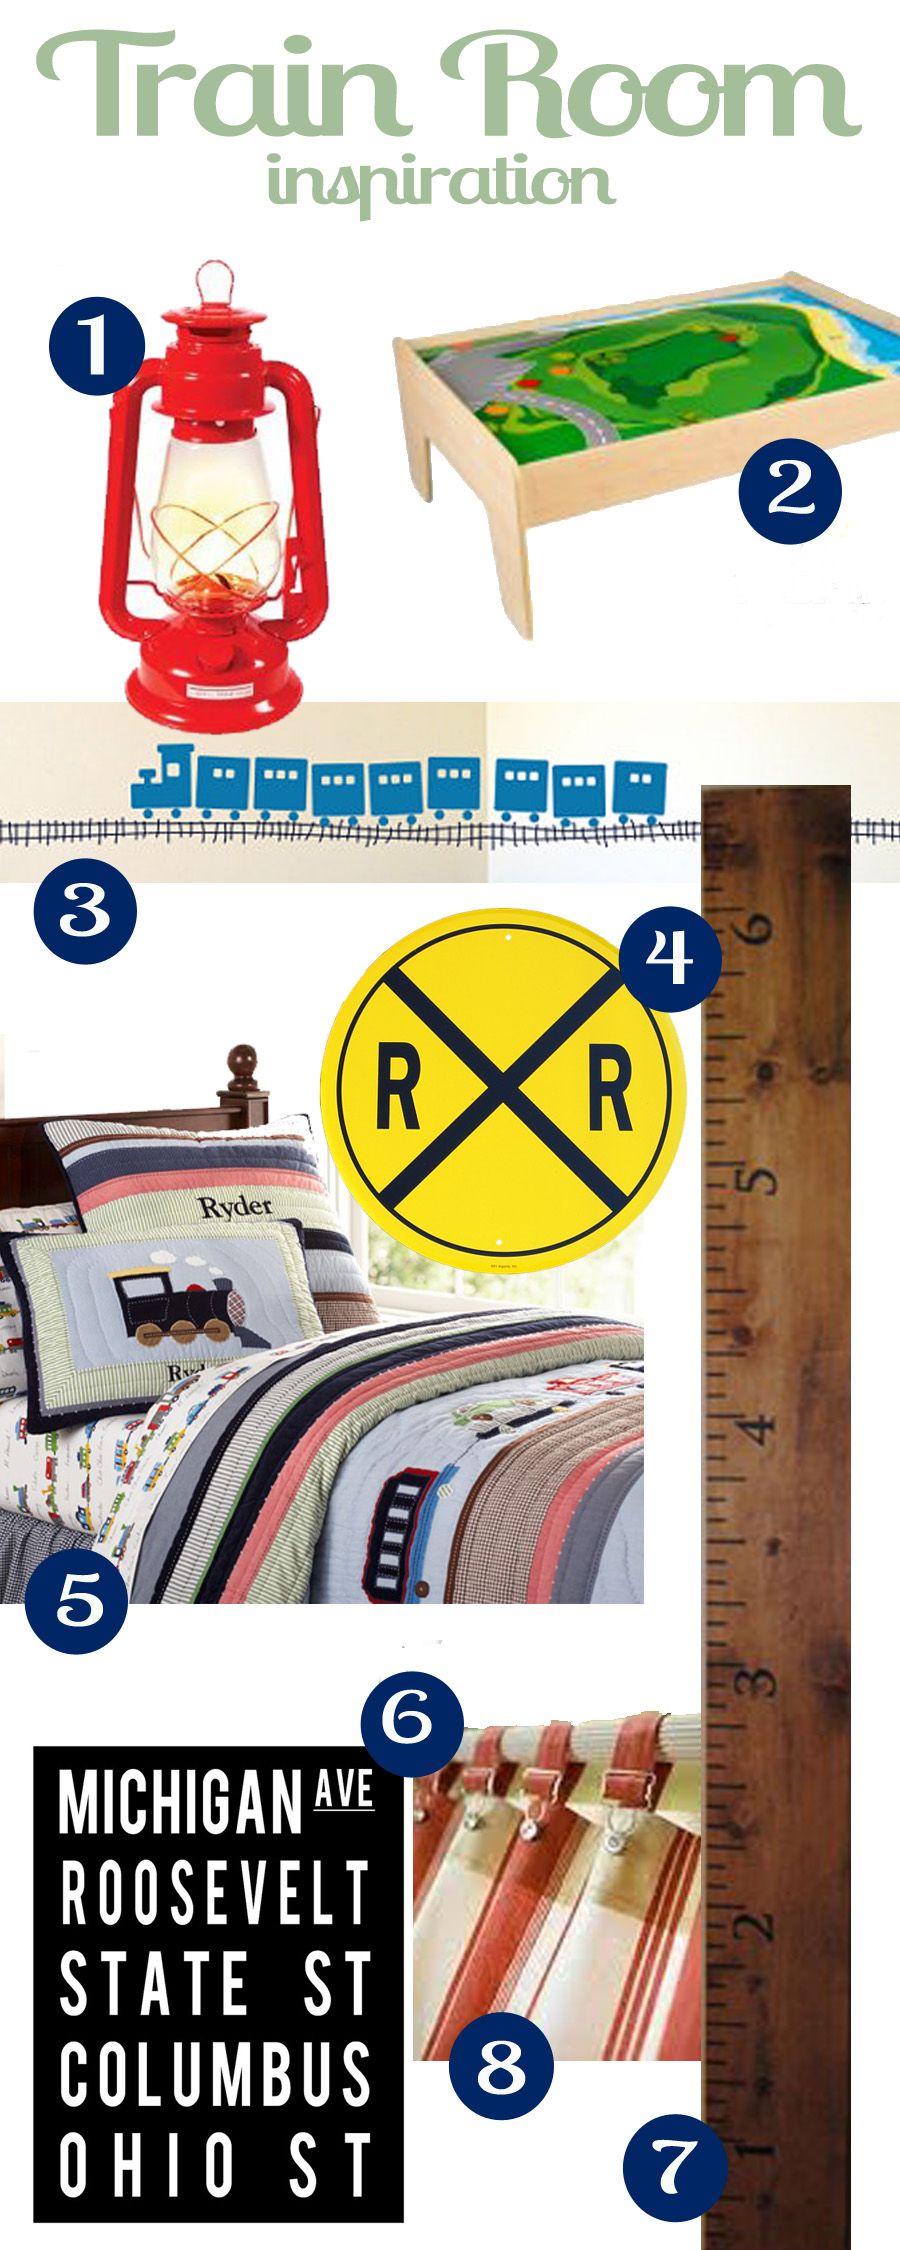
This giant ruler growth chart would be a great addition to any room. It is easy to make and takes a few hours of an afternoon (mostly time to let stain and paint dry).

{DIY} Giant Ruler Growth Chart

Giant Ruler Growth Chart

What you need:
Wood board, at least 6 1/2 ft in height
Sand paper
Saw horses
Saw
Stain
Old towel
Pencil
Yard stick or tape measure
Large number stencils (plastic ones work best)
White paint
Gloss Spray Coating (if desired)
Nails or screws
Saw hooks

To make:

Measure your board and cut to size. You will likely not be starting your measurements on the ruler at 0, to leave room for the baseboards . We made our board 6 ft, but the measurements on the board actually go up to 6 and a half feet.

Sand board until smooth, if needed. Remove all saw dust from board with a slightly damp cloth. Allow to completely dry before staining.

Dip the tip of an old rag or towel in the stain. Lightly brush the stain, going with the grain. You may want to do two or three coats. Allow to dry in between coats.

Once dry, using a yard stick or tape measure, mark out each inch using a pencil at the right side of each board. I made my 6 inch and 1 foot marks a bit longer.

Using painters tape, tape your stencils to the left of each foot mark. Using your yard stick, make sure they measure up.

Take white paint and lightly brush over measurement marks. I did not care for mine to be perfect lines, so I gently placed the brush and used one stroke from the inside, to the outside. Fill the stencils with white paint. You may want to do two or three coats, depending on preference. Allow to dry between coats.

DIY growth chart

Remove stencils once dry. Touch up any necessary spots with tip of small paint brush. If you’d like a light sheen over the board, coat with clear acrylic spray paint. You will need to do this about three times. Allow to dry in between each spray.

DIY Growth ChartTo hang, nail a saw hook to the top and bottom of the back of the growth chart. Measure the spacing and place nail or screw in wall. Hang on wall.

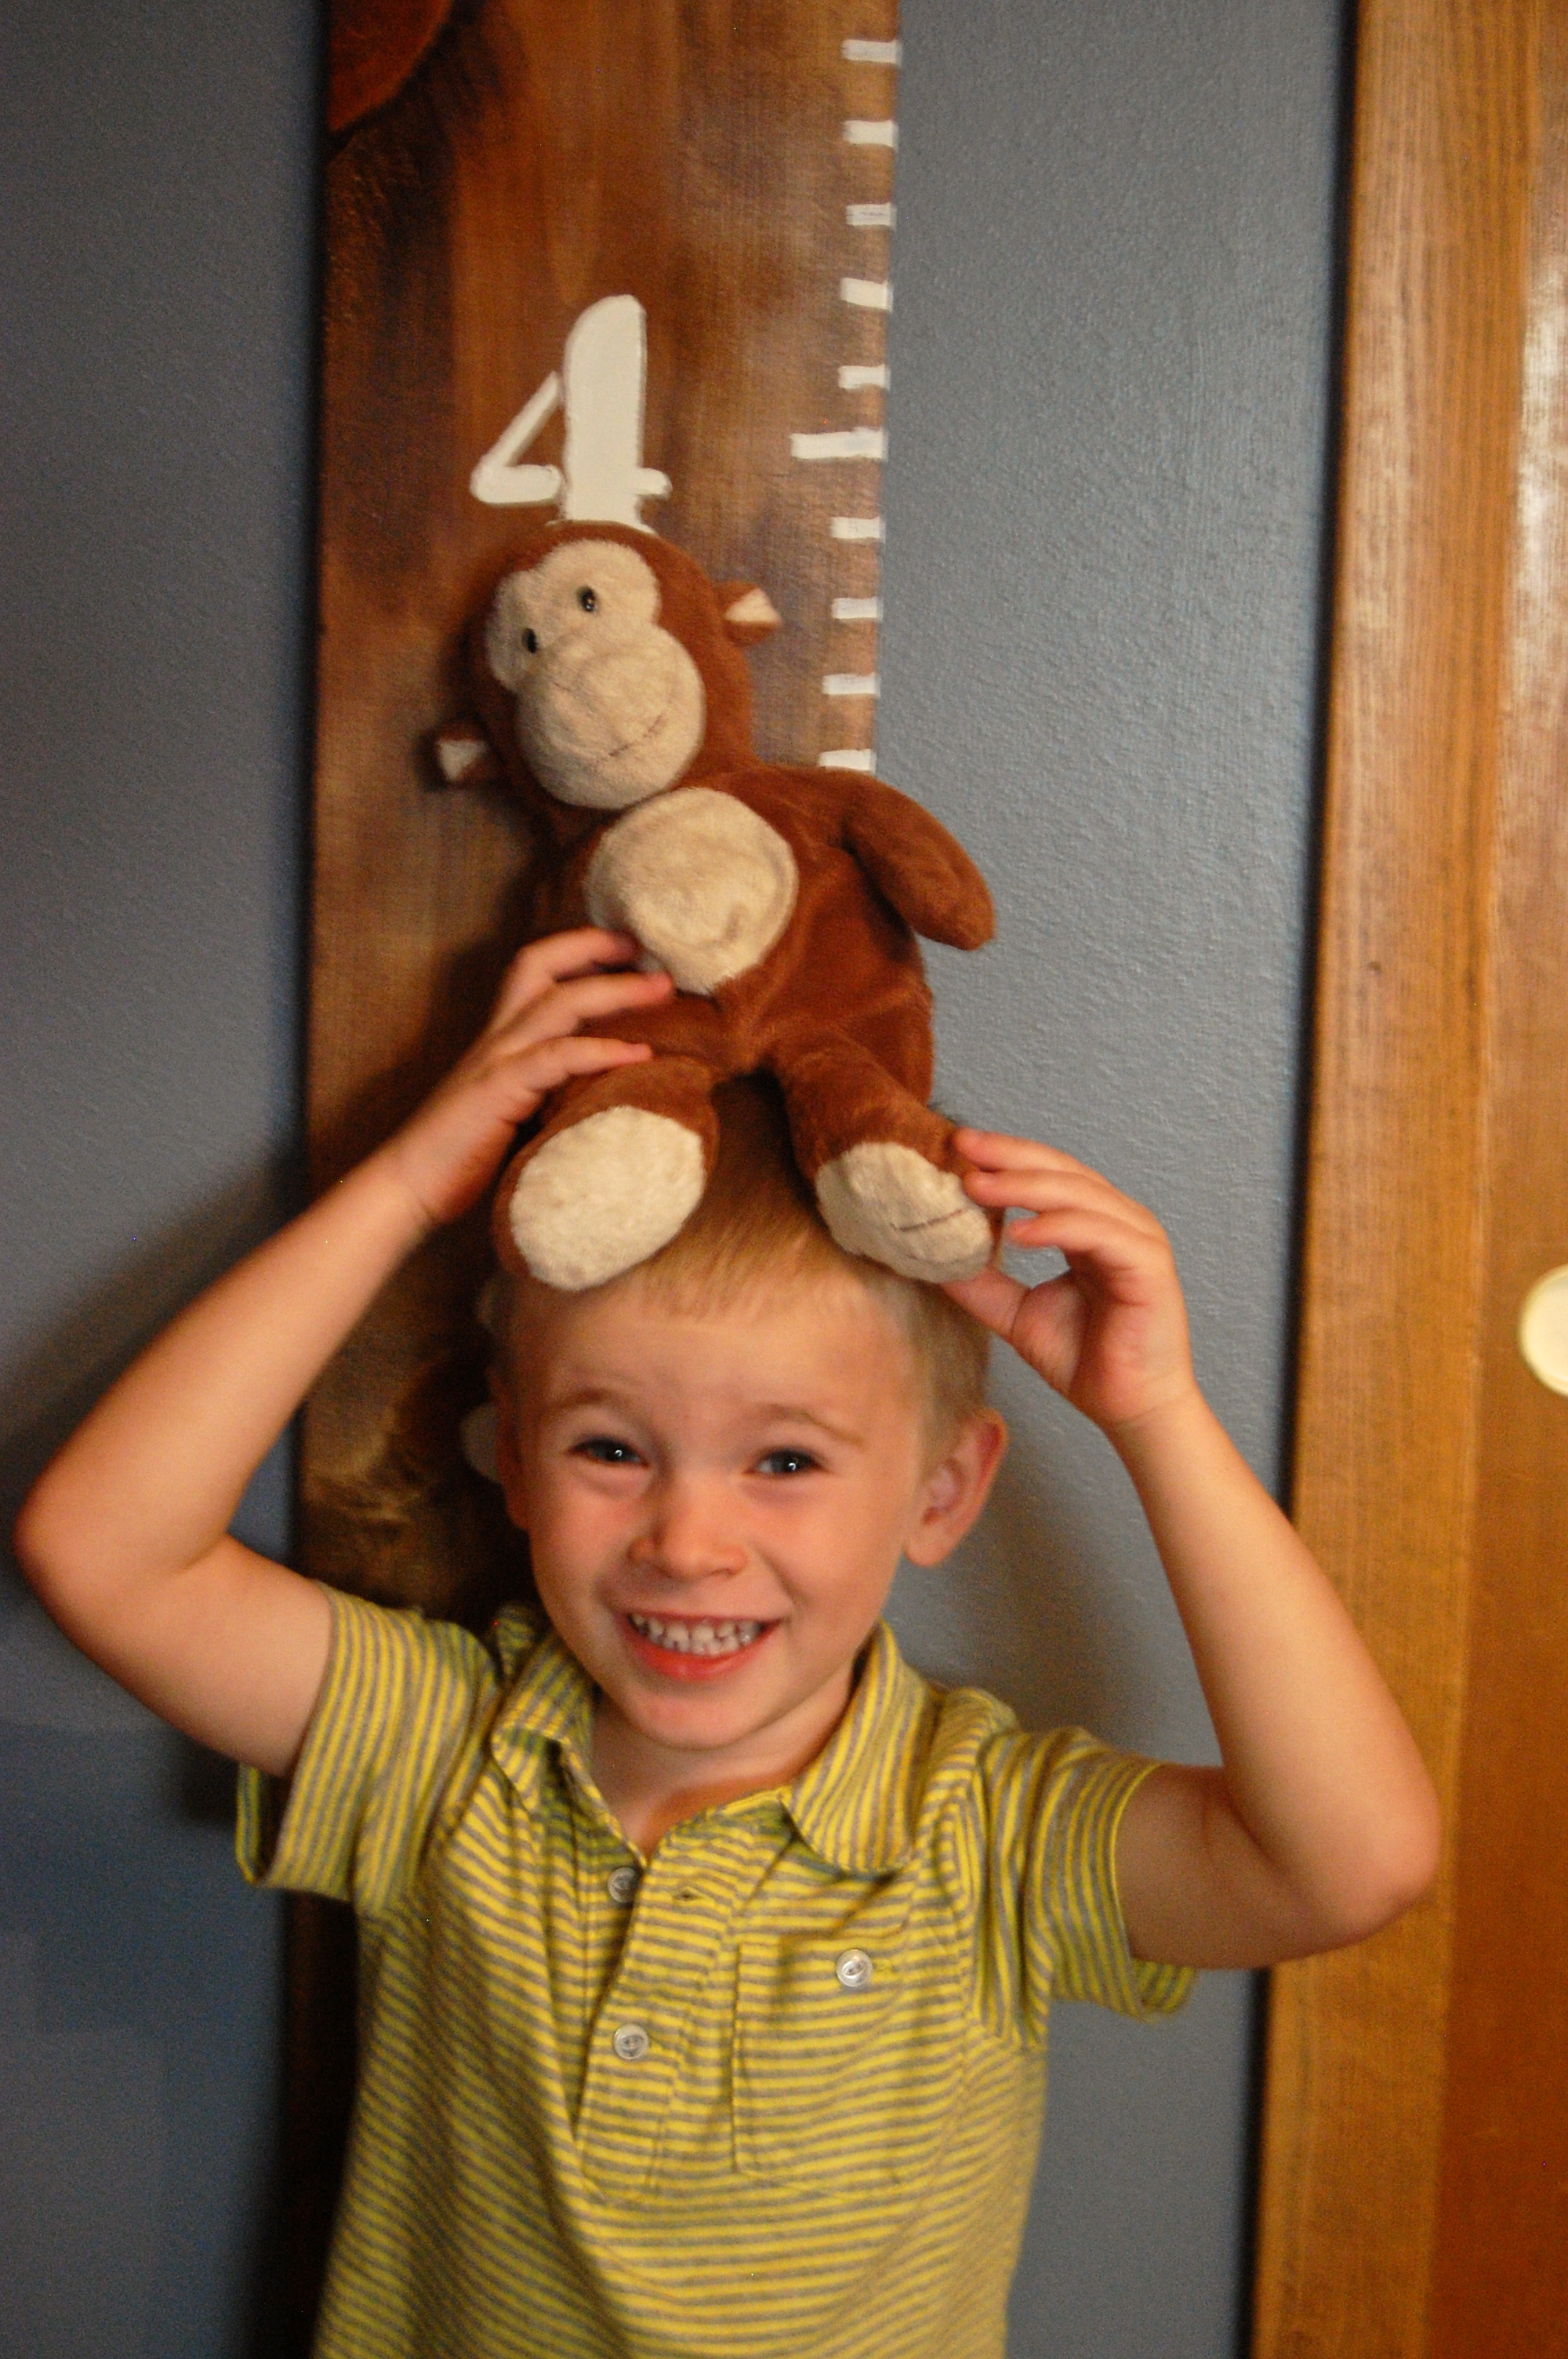
Then go ahead and measure your little (or not so little) ones! Lincoln and Bobo are up to 4ft!

ruler growth chart

stef

10 Comments

Filed under Decorate, DIY

DIY Valentine Chalkboard Decor

Valentine’s Day is not my favorite holiday. If not for my dislike for chocolate, my hatred for overpriced greeting cards and crowded restaurants, maybe I would enjoy it a bit more. But I am not a total curmudgeon. I still like to sprinkle my house with a few hearts and kisses and share an extra hug or two.

I am constantly seeing gorgeous pictures of holiday mantles. Unfortunately for me, I have no mantle. I use the space above my living room TV as a mantle, using shelves, pictures, wreaths and frames to break up the large wall. This Christmas I purchased a large, old frame for $2 from Goodwill and did a little chalkboard rehab on it (similar to this post). I hung it above my TV, tied a wreath on with some fabric and wrote “peace” at the bottom. I fell in love with it and decided I would use it all year long and switch it up of the different holidays and seasons.

DIY Valentine Chalkboard Decor

For Valentine’s Day, I used all items I have laying around the house. It took about 10 minutes and brings cheer and color to the room!

DIY Valentine Chalkboard Decor
What you need:
Red and pink patterned scrapbook paper
Jute
Flat pushpins
Mini wooden clothespins
Chalk

Fold paper in half. Draw half-hearts and cut around with scissors. Make in slightly different sizes and shapes. I made four for each jute strand, eight in total.

Cut jute to desired lengths. Stick pushpin through the jute and affix to the back of the frame. Drape across the front and pin the other side to the opposite backside of the frame. Overlap for the second strand, following the same process.

Clip paper hearts to the strands. Write your favorite love phrase at the bottom with a few small hearts drawn with chalk and hang on the wall.

This is a very easy, very quick project. If you were more ambitious, you could sew some small fabric hearts to attach to the jute strands.

DIY Valentine Decor

Wishing you a very happy Valentine’s Day from Haute Apple Pie! Check out the links below for other Valentine projects and recipes:
Free Valentine’s Day Typography Download
Sew Sweet Valentines
Picture Perfect Valentines
Orange Scented French Toast with Nutella
Cinnamon French Toast with Cranberry Orange Chutney
Valentine’s Date Night In
Velvety Hot Fudge Sauce
Berry Mousse Pie

stef

1 Comment

Filed under Decorate, DIY, Valentine's Day

Train Room Inspiration

To mark his entrance into “big boy-hood,” Lincoln’s once soft and adorable nursery is getting one big choo choo overhaul. The little man is train-obsessed and we want to give him a room to match his toddler-sized passion. We’ve been to plenty of train museums, shows, exhibits and watched enough Thomas and other train shows to have a fairly good grip on what a super cool train room might involve. The room is a work in progress. I put this inspiration board together to help the decorating and accents along the way.

trainroom

1. Red Train Lantern 2. KidKraft Train Table 3. TheStickerHut Train decal 4. Aluminum Railroad Crossing Sign 5. Pottery Barn Ryder Train Bedding 6. Chicago Subway Art 7. DIY Ruler Growth Chart 8. Overall Curtains via BHG

The room is close to completion, with the help of this inspiration board and Lincoln is bouncing off his big boy bed about it. I’ll post the room when all the projects are complete!

stef

Leave a comment

Filed under Decorate

Rudolph the Reindeer Treat Bags

We are Rudolph obsessed in our house this year, therefore, this project was inspired by my little guy. If you are looking for a last minute way to wrap up some of those delicious Christmas cookies or homemade goodies for your friends and neighbors, or looking for a cute and simple way to wrap a gift for a little one, call on the most favorite reindeer of all – Rudolph! I recently made these goodie bags for a kid’s Christmas party and filled them with bags of homemade hot chocolate mix, hot chocolate spoons and Christmas cookies. They are easy to make and fun for your little elves to help with as well.

Rudolph Treat Bags via Haute Apple Pie

What you need:
Brown paper lunch bags
Large google eyes
Red pom poms
Brown cardstock
Scissors or circle punch
Black permanent marker
Brown pipe cleaners
Scissors or wire cutter
Glue (Elmers or Tacky)
Clear tape

Using a circle punch or scissors. Cut one-inch circles from brown cardstock.

Lay the paper bag flat. Glue on eyes. Make sure to leave at least 3-4 inches of space at the top to fold over. Glue brown paper circle to bag. Glue red pom on top of brown circle. Using a marker, draw a mouth. I had fun with this and made them all different. Some with buck teeth, some sticking their tongue out, etc. Allow to dry.

Fill bag with goodies or gift. Fold over firmly. Slide one pipe clear tightly to the crease of the bag. Tape the bag in place. Bend the ends of the pipe cleaner upward. With a scissors or wire cutter, cut a pipe cleaner in half. Twist one on each side to create antlers.

Rudolph the Reindeer Treat Bags via Haute Apple Pie

I’m sure everyone will love these so much, they will shout out with glee. Too far?

Happy holidays to you and yours.

stef

2 Comments

Filed under Christmas, DIY

DIY Fabric Scrap Wreath

For Mother’s Day this year I told my mom I would create a new wreath to hang on her front door for the summer. While our most favorite of baseball teams may resemble more of the Bad News Bears than the Cubs this year, Cubbie love never fades. It took me an embarrassingly long time to get to this project completed, but we are both very happy with the way it turned out.

You can use fabric scraps from around the house, scrounge the clearance bin or pick specific patterns for the occasion for which you would like to create this door adorner. My hand got a bit sore (and thumb blistered) from cutting up so much material, but once everything is cut, it is a great in front of the TV project to put together. It took me about 2-3 hours to cut and assemble the entire fabric wreath.

I know there are various other versions of these across the web, but I had a hard time finding one that gave me specific fabric amounts and other directions, so I decided to share it here with you!

What you need:
2 1/2 yards of fabric
Pinking shears
12″ wire wreath frame
Ribbon for hanging

Start by cutting strips of fabric. Each strip should be about 6-8 inches long and 1 to 1 1/2 inches wide. Do not be too precise. The wreath looks a bit more rustic if each piece isn’t exactly the same.

Once your fabric is cut (or alternate if your hand gets tired), begin tying your fabric stripes onto the wire frame. I just used a cross over double knot to secure the fabric on the wire. For shorter pieces, I often knotted once. Alternate fabric choices along each piece, tying them on, then sliding them down and bunching them together. The more fabric you put on the frame, the fuller the wreath will turn out, so try not to leave any wire showing.

Just as with the cutting, the same goes for the tying. It doesn’t need to be precise. The fabrics do not need to be precisely alternated, just hold the wreath back and make sure it doesn’t look lopsided with one fabric over the other (unless that is the design you are trying to attain).

Cut the ribbon to desired length, depending on your door or wreath hook. Tie a simple knot to secure. Slid the knot around and hang the wreath.

It is as simple as that! I plan to make a fall one of these for my door, perhaps Chicago Bears??

The Cubs motto sadly seems to be, “There is always next year” which is why this wreath will always have its place.

2 Comments

Filed under DIY

{DIY} Curtain Rod Gallery Wall

With an ever growing family, my mom was looking for a good way to display photos and swap them out or add to them whenever she wanted. A traditional gallery wall includes a lot of nails and holes, so that was not an option. My mom came up with this great curtain rod gallery that is perfect for the person who wants to spare their wall from dozens of puncture wounds. It is simple, interchangeable and is a great place to add holiday accents as well!

What you need:

Sturdy curtain rod and hanging accessories
Shower curtain hooks
Picture frames
Triangle or rounded picture hooks and small screws
Cord or ribbon

Measure out and center your curtain rod. Drill holes and hang according to directions. Make sure to use a sturdy curtain rod and reinforce the screws so the rod can hold the weight of the pictures.

On the back of the picture frames, drill proper sized hole in the back of each frame. Screw down the picture hooks to each side.

Cut ribbon or cord to desired length and string through the hooks. Tie in a knot or bow at the back.

Add shower curtain hooks to the curtain rod. Loop the top around shower hook to hang up each picture frame.

Stand back and admire your work!

When the pictures hang at different lengths it gives a great visual effect and helps to fill a large wall. You can turn the frames vertical and horizontal as you switch them out. During the holidays, this curtain rod is a great way to display a festive wreath, or string some ornaments or garland.

4 Comments

Filed under Decorate, DIY

DIY Succulent Terrarium

A few months back my mom came to visit with this large glass apothecary-esque jar in tow.

“I figured you could use it for something,” she said. “Maybe a terrarium?” Brilliant. It was perfect for a terrarium to bring a little green to my new office at work, which happens to have a large, sunny (and empty) window ledge.

Last weekend when picking up a few extra vegetables and plants for my actual garden, I finally got around to getting the goods for my terrarium. Instead of the moisture-loving plants found in many terrariums, I went with charming succulents to create a quirky, low maintenance cactus terrarium.

This is a pretty foolproof project even if you’re not the gardening type. The hardest part of the whole project was editing my plant selection! I ended up with two neon colored cactus, an aloe plant, a mini jade, two sempervivum and a frilly ground cover succulent – which I’m happy to report are thriving so far.

What You’ll Need:
glass jar, apothecary jar or similar transparent container
variety of mini succulent plants, such as cactus, aloe, jade, sempervivum
cactus soil (quantity will depend on size of your container)
small river rocks
gardening charcoal (found at your local garden store)
a spoon

*NOTE: These are rough instructions. Depending on the size and shape of your terrarium container, you may not need all three “soil” items or you may need to adjust things to fit in a smaller container.

1. Line the bottom of the container with a thin layer of charcoal. This helps with drainage and with preventing potential odors in your terrarium.

2. Next, line with a thin layer of river rocks. In a smaller container you could reverse the layers of soil and rocks for a more “zen garden” look.

3. Depending on the size and shape of your container you may be able to put the cactus soil in first or the succulents, filling in the soil around them. I had to put the plants in and use a spoon to fill soil around the plants in order to fit them. Place plants as desired to mix up shapes and colors.
4. Finish off with soil or with additional rocks to achieve the look you want.

Care: Your succulent terrarium needs lots of sunlight but only needs to be lightly watered about once a week. If you choose to keep a lid on it, water less frequently as the plants will generate moisture.

6 Comments

Filed under Decorate, DIY, Garden

{DIY} Playroom Chalkboard Wall

After a couple of years, you get to a point in your young parenting life when you relinquish the ideas of your former self. Last year I converted my old work/workout area into a inspired writer’s nook. A lovely thought, right? Over a year later, I believe I wrote from that spot a total of three times. If I got a chance to work on my writing, it was likely at the dining room table in between making dinner, doing some work and cleaning up crayons. Our once adult basement slowly transformed. With large plastic toys cluttering the basement TV viewing area, the man cave part of the basement was a man cave no more. So I threw up the white flag. Mommy surrender.

My once serene writer’s nook has been transformed into a toddler’s playroom. The sacrifice was worth the reward. We now have friends over to watch a game while the kids quietly (or not so quietly) play right behind us, and we know they are safe. I plan on showing the full playroom in weeks to come when I finish the cute sporty touches, but for now, I wanted to share a little fun art corner addition.

Our toy room is sectioned off by two three foot tall walls that divide the room. I decided it was the perfect height and length to turn it into a chalkboard wall for Lincoln and his friends. Originally, I just planned on painting the wall, until I discovered chalkboard contact paper. Much less fuss, much less smell, much less mess and hopefully easier to clean up if I decide I do not want it anymore.

I ordered the contact paper through Amazon. I needed two rolls to fill our wall space. It is easiest to have someone help you to reduce the amount of bubbles in the paper.

What you need:
Chalkboard contact paper
Scissors
Single edge razor blade or Exacto knife
Credit card
Chalk

The process is pretty simple. Cut your paper to the length of your space (I made mine a little longer and cut it off at the end). Peel of the back of the contact paper. Starting at the top of the wall, press across then down. Continue this until you reach the bottom. Pull downward and a little bit outward with the paper to avoid bubbles. Use a credit card to smooth the paper and adhere it to the wall. Cut the extra edges (if you have any) with a scissors. If you have any small overlaps over molding or at the corners, take an Exacto knife and simply slice off the extra pieces, being careful not to slice the wall. Repeat with as many pieces as you need to fill your space. Make sure to line up your paper and make as few seams as possible.

Lincoln was very excited to get to play on his new chalkboard wall and I am happy as a clam typing with my Mac in my lap or on the table. Life may not be what it used to be, but life is pretty darn good.

I’ve got something cooking for the other side, which I will share in the future. I plan to use the leftover contact paper for some fun projects too. Stay tuned!

2 Comments

Filed under Decorate, DIY, Family

{Inspired by} Peacocks

As far as birds go, it does not get any fancier than a peacock. It is no wonder these birds can reel in the ladies, bringing in several at one time with one swift spread of the feathers. I know I am not alone by being drawn into the iridescent array of colorful feathers of these beautiful creatures. I’ve been to a few events recently that have been peacock-inspired with beautiful blues and greens sprinkled throughout the room.

This past weekend, I attended a pre-wedding celebration bridal shower for my friend Jen. Being a bird-lover, she had a peacock themed shower with peacock invitations and a few peacock touches. As a bridesmaid, I wanted to help add an extra special touch to the day, so I created peacock name tags to hang from the water glasses and a few peacock colored tissue poms that rested on the mantle.

A little over a year ago, my dear friend Doug married his lovely bride Stacy and hosted one of the most beautiful wedding receptions I’ve ever attended. Peacock inspiration was everywhere from the flower girl to the name cards. It was elegant and sophisticated with a modern flare. To start out the peacock theme, I designed their wedding save-the-date with a little peacock touch. (You can find this design in my Etsy shop, Morning Star Designs).

A special shout out to Robb Davidson Photography for the photos from Doug and Stacy’s wedding. If you live in the Chicagoland area and are looking for a fabulous and inspired photographer, check out Robb. He is great!

If you have any peacock-themed events you’ve experienced, we’d love for you to share a link!

Leave a comment

Filed under Decorate, Entertain, Weddings

Lovely Little Lady Baby Celebration

Maybe it is the second child in me, but I feel like every baby deserves a celebration. So when we found out our very own Anne was expecting her second little girl this spring, we just had to throw a little soiree. We called this a baby celebration, rather than a shower. We gathered on a Sunday afternoon for some sweet treats and hot drinks in celebration of the newest lovely little lady!

Guests were invited with the bunting flag invites which set the scene for the pink sweets table (for sale in my Etsy shop here!).


We set up a sweets table in the basement that included thumbprint cookies, cherry chip cookies, fruit and fluff dip and a snickerdoodle cake. Little pink touches were added throughout with plates, napkins, ribbons and flowers. Homemade pink and white tissue pom poms hung from the ceiling. Guests were also treated to a hot chocolate & coffee bar with lots of fun mix-ins, including Bailey’s Irish Cream, Kahlua, Amaretto liquor, vanilla syrup, infused whipped creams, and hand-dipped marshmallows.

A Snickerdoodle Cake with Brown Sugar Buttercream was served. It was topped with a little bunting flag printed on scrapbook paper, threaded and tied to bamboo skewers. The recipe for the cake can be found on Foodie with Family.

We had a great time chatting, eating, drinking and celebrating the upcoming birth of what we know we will be a lovely little lady! February was quite the month for parties and I was thrilled to end the month on such a bright cheery note! We wish Anne and her family the very best as they anticipate the arrival of baby number two!

3 Comments

Filed under Baby Shower, Decorate, DIY, Entertain, Treats