Author Archives: kkregel

{Gift Guide} Cranberry & Cardinal

Anne’s Picks

This time of year, I long for all things warm and cozy and my picks tend to revolve around that theme.  For the cook in your life, a dutch oven in a beautiful shade of red is a must have for slow cooked meals on a cold day.   And I know that I cannot get through our Wisconsin winters without a new cozy scarf or beautiful throw, both perfect for anyone who can be hard to shop for.  And don’t forget the little ones!  The little girl in your life  will love this adorable and whimsical doll from the land of nod.

red-anne

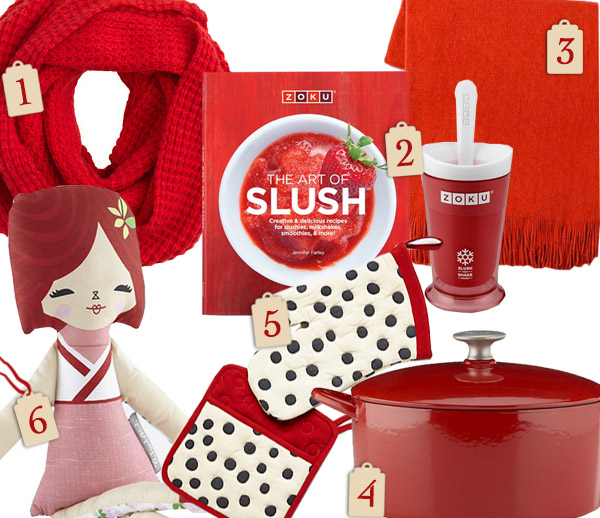
1. Waffle stitch infinity scarf ($65) 2. Zoku slush and shake maker with book ($34.95) 3. Softest throw ($49) 4. Dutch oven ($99.95) 5. Polka dot potholders ($14) 6. Hello doll ($19.95)

Katie’s Picks

I’m lusting over all of these items so the best I can do is narrow it down to two picks. Guys and gals alike will be pumped to open a pair of comfy, on trend New Balance Classics. This rich Men’s cranberry color is an undercover cool type shade but if you’re looking for something punchier there are plenty of those to choose from. If you’re looking for something a little more traditional, I’d go with this toasty, artisan buffalo plaid blanket from the nearly 150 year old Faribault Woolen Mill (which just happens to be next door to my home town!).

red-katie

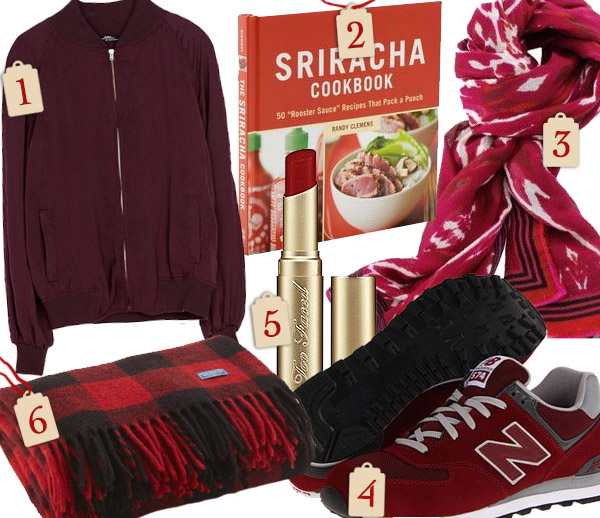
1. Bomber jacket ($69.90), 2. The Sriracha Cookbook ($16.99), 3. Palm Springs scarf in Red Ikat ($59), 4. New Balance Classics sneakers ($74.95), 5. La Creme lipstick in Stiletto ($21), 6. Buffalo plaid wool blanket ($100)

Stef’s Picks

You can’t have Christmas without a little glitz. I’m a huge fan of all things Stella & Dot and love the Mae necklace layered with some of your other favorite jewels to spice up a little black dress or a simple tee. If you are looking for something for the rambunctious boy in your life, try a Hot Wheels Remote Control Camaro. For a great price, this little car will ensure excitement under the tree on Christmas morning.

red-stef

New Clean Edge Wool Fedora ($50) Stella & Dot Mae Necklace ($49) Mack Cheers Tumblers ($45) Hot Wheels R/C Camaro ($20) Le Crueset 7 Piece Cherry Tool Set ($75)

Advertisement

Leave a comment

Filed under Christmas, Fab Finds

Hearty White Bean & Smoked Ham Soup

Have you ever have a favorite lunch or dinner place that you max out on or move further away from and then totally forget about for awhile? Then one day something trips a magical memory trigger and you suddenly ask yourself why it’s been forever since their deliciousness has crossed your path?

This happened to me recently and in my case, it’s an extremely tiny and eclectic soup place. A Milwaukee “soup Nazi” of sorts that I worked by for years until my career took me around town for a few years to offices far from his shop. When I moved back to a downtown office almost two years ago, I had all but forgotten about the place – until a few weeks ago. It was one of those first grey, gloomy and freezing pre-winter days and a Whole Foods salad just wasn’t going to cut it. I needed warm, hearty soup and BOOM, memory trigger tripped.

I ordered a Northern Bean and Ham Soup and couldn’t stop thinking about it so I took my own riff on recreating it for home – swapping his rice for barley and tossing in a few more vegetables from the remains of my CSA. Now, even though I’ll be going back again soon, I’ve got a permanent reminder in my files.

white bean and ham soup

White Bean & Ham Soup
8-10oz smoked ham hock, deboned and cubed
1 C pearl barley
2 carrots, peeled and chopped
3 stalks celery, diced
1 C swiss chard or kale, stems removed & leaves chopped
1/2 medium onion, finely chopped
2 cloves garlic, minced
2 cans great Northern white beans
5 C chicken stock
1 C half and half or 2% milk
6 Tbsp butter
kosher salt
black pepper

Prep and chop all vegetables. Melt butter in a large stock pot and once almost melted, add onion, carrot and celery. Saute vegetables over medium heat for 6-8 minutes. Season well with salt and pepper. Once they begin to soften, add garlic and saute another 3-4 minutes. Add small amounts of chicken stock as needed if vegetables begin to stick to the pan, using a wooden spoon to scrape any browned bits off the bottom into the stock.

Add ham, beans, barley and remaining stock. Stir to combine and reduce heat to a low simmer. Cook for 20 minutes, then add kale/chard and half and half. Continue to simmer for another 30 minutes, checking to see that barley is fully cooked. Season well with salt – about 1-2 tsp – until flavors pop.

white bean and smoked ham soup

katie

4 Comments

Filed under Main Dish, Make Ahead Meal

Superfood Smoothies

Smoothies are nothing new, although green versions are popping up like weeds in cafes and juice bars. If you’re on Pinterest, you’ve probably pinned a zillion recipes already but this is my go-to version. I started making these regularly for breakfast over the summer, sometimes alternating them with protein shakes. I played with a variety of ingredients and techniques but landed on this combo of fruit, veg and “power” ingredients to maximize benefits without loading on too many cals.

Here are my ingredient Cliff notes:
Beets: I totally dig beets with carrots as an occasional substitute. The key to a great texture with beets is grating them…preferably with a microplane grater to get an ultrafine texture that isn’t overbearing. Red beets will give you a gorgeous magenta smoothie but chioggia or golden beets will get masked by your greens if you’re more of a green smoothie literalist.

Greens: I say ‘greens’ because you can really use whatever you like or have on hand. Spinach, chard and beet greens (double duty ingredient!) will give you a smoother texture than kale, which tends to be a little coarser but still tasty.

Fruit: Use what’s in season or your favorites. I like pineapple as a base because it’s ultra juicy.

Liquids: After trying various combos, I settled on unsweetened almond milk and coconut water as my liquids for the relative nutritional benefits with fewer calories than juice or milk.

Chia Seeds: Relatively flavorless, these antioxidant and omega-3 packed gems also help me to feel more full. I personally like the ground version but you could use whole seeds.

Greek Yogurt: This is an optional thickener and smooth-ier. I like the protein it adds but you could skip it if desired.

green-smoothie
beet-smoothie
Superfood Smoothies
1 C greens (any combo of spinach, beet greens, kale or swiss chard), washed and chopped
1/3 cucumber (about 4-5 thick slices), sliced and quartered
1 small beet, peeled and finely grated (use a microplane!)
3/4 C pineapple, chopped
2 other pieces seasonal fruit in any combo: 1 banana, peach, pear or green apple, 2 large handfuls of berries, or 2 kiwis
6-8 oz vanilla Greek yogurt
splash lime juice
1 C unsweetened almond milk
1/2 C coconut water
2 Tbsp chia seeds

Add greens, cucumber and grated beet to a blender with almond milk and coconut water. Blend until smooth and all large chunks are gone. Add chia seeds and any fruit that is more fibrous or firm, such as an an apple or pear. Blend again. Add pineapple and any additional fruit. Blend again. Finally add lime juice and yogurt and give a final blend.

Multiple blends will help you get the smoothest texture so if you prefer it smoother than after your final blend, pulse a bit longer to gain desired texture.

green-smoothie4
green-smoothie3
Busy mornings? Make your smoothies ahead of time! Since one batch will make two smoothies, you can make one for yourself and someone else or make two days worth of breakfasts at once. I like these Thermos brand bottles that I found at Target. They hold a perfect amount and have a straw for convenient sipping in the car or at my desk.
green-smoothie2

katie

1 Comment

Filed under Drinks, Healthy

{Giveaway} Dog City & Co. sWag Pack!

When Dog City & Co. reached out to share their petlover products with us, I was charmed by their designs and immediately went searching for my favorite breed (Lab, of course). From mugs to prints to pillows, they have lots of sweet and affordable gift options for your pet-obsessed fam and friends (stocking stuffers anyone??). Plus, they donate a portion of every sale to animal shelters and other rescue-related organizations, which makes me like them even more.
dogcity-giveaway2
After scoping out the goods they were kind enough to send me, my pooch, Lena, and I can vouch that they are dog and owner approved. Their slightly oversized mug is perfect for your weekend lattes or adding a little extra whipped cream to your cocoa and the tote is roomy enough to use as a yoga/gym bag or to stash a blanket, treats and tennis balls for a trip to the dog park.

dogcity-giveaway1

{Giveaway} sWag Pack!

This week one lucky reader will win a Dog City & Co. sWag Pack including a coffee mug, tote bag and decal in the breed design of your favorite pup (or cat).

How to Enter:
1. Leave us comment below telling us 3 things about your favorite pet (dog or cat!) – their name, breed, and one thing about them that reminds you why you’re a pet owner.
2. Like us on Facebook for an extra entry
3. Like Dog City & Co. on Facebook for an extra entry

The random winner will be selected and announced this Friday.
dogcity-giveaway3
katie

28 Comments

Filed under Covetable Goods, Giveaway

Broccoli, Kohlrabi & Cheddar Soup

Dear Broccoli Cheese Soup,
I’m sorry I always thought you were gross. I was judgy, not believing that you could be anything more than a lunch room catastrophe. I was wrong. As it turns out, you’re a CSA box miracle. A girl can only eat so many kinds of kohlrabi slaw and you neatly absorbed its persistent appearance in my box without batting an eye. I’ve realized the errors of my ways and am now sharing your magic with the world.
Humbly yours,
Katie
kohlrabi-soup
kohlrabi-soup3
Broccoli Kohlrabi & Cheddar Soup
1 large head of broccoli, trimmed to florets
1 large kohlrabi, cubed
3/4 C carrots, julienned
1 small yellow onion, chopped
2 1/2 C chicken stock
2 C sharp cheddar cheese, shredded
1/2 C parmesan cheese, shredded
2 C low fat milk
6 Tbsp butter
1/4 C flour
1 tsp dijon mustard
1 1/2 – 2 tsp kosher salt
cracked black pepper

Trim broccoli. Remove exterior from kohlrabi and cube. Julienne carrots or measure out prepared matchstick carrots. Melt three Tbsp butter in a large stock pot, then add in onions and kohlrabi. Saute for 5-7 minutes, then add broccoli and carrots. Saute for another 5 minutes. Next, add chicken stock to pot. Reduce heat slightly to medium-low and cover. Allow vegetables to steam for 20 minutes, stirring occasionally.

Working in two batches, transfer vegetables and stock to a large food processor or blender and puree to desired consistency (I like mine to be fairly smooth). Transfer pureed vegetables back into stock pot.

Meanwhile, in a separate pot, melt remaining three Tbsp butter over medium heat. Whisk in flour. Gradually add milk about 1/2 C at a time to thin out the flour. Once milk is fully incorporated, whisk in cheeses. Let simmer for 4-5 minutes, stirring occasionally until cheese is mostly melted. Transfer cheese mixture into stock pot and stir to combine.

Stir in mustard, salt and black pepper. Adjust seasonings to taste and let simmer for another 10 minutes.
kohlrabi-soup2

katie

4 Comments

Filed under Garden, Make Ahead Meal

Carrot Cashew Salad with Feta

This year I’ve had my first successful batch of grown-from-seed carrots consistently popping up in my garden and they have been so fun to dig up and play around with in the kitchen. The multi-colored variety makes salads particularly charming, especially when paired up with fellow garden dwellers of mint and jalapeno.

I had originally found this recipe in a Food Network Magazine but took my own twist on it based on some other flavors I love with carrots. You get a great mix of tangy, sweet, and salty flavors with just enough heat to keep you going back for more. This salad also makes for a yummy and filling leftover lunch when paired with a little leftover grilled meat or a chunk of baguette.
carrots

carrot-salad1

Carrot Cashew Salad with Feta
adapted from Food Network
carrots
2-3 oz crumbled feta
1-2 Tbsp mint
1/3 C + 2 Tbsp lightly salted cashew pieces
1 Tbsp olive oil
1/2 jalapeno, seeded & chopped
3 tablespoons lime juice
1/4 cup water

Slice or shave carrots into very thin pieces and place in a bowl. A vegetable peeler or mandolin can create consistent thickness. Add mint leaves, feta and 2 Tbsp of cashew pieces. Meanwhile, puree cashews in a small food processor with oil and jalapeno. Puree in lime juice and water until almost smooth.  Pour dressing over carrots and toss lightly. Season with salt to taste.

carrot-salad2

katie

1 Comment

Filed under Garden, Quick & Easy, Sides

Blue Cheese Burgers with Bacon-Onion Jam

I’ve been the beneficiary of multiple rounds of sweet onions in my CSA during the past few weeks. While in the winter I use onions left and right for soups and warm comfort foods, I never realized that they weren’t a big part of my summer repertoire. Sure, I use them here or there but I tend to sway toward herbally green onions instead.

With a desire to throw as much on the grill as possible in the summer I decided to use my onion bounty to create a gourmet burger. I wanted to caramelize them somehow – I don’t care for them raw – and was lured in by a savory Bacon-Onion Jam recipe on Pinterest. The smoky-sweet jam is chock full of some of my favorite big flavors so it needs a burger that can stand up to it. Enter blue cheese – which does double duty as a fatty/creamy binder if you happen to be using an ultra lean game meat like the elk that I used. Beef will work just fine of course but if you happen to have access to game meat it cuts the richness (and calories) down a little.

Serve with a simple salad to let the burger itself take center stage.
blue-cheese-burger2
Blue Cheese Elk Burgers
1 lb ground elk (or beef, venison, buffalo, etc)
1/2 tsp garlic powder
1/2 tsp liquid smoke
1 tsp Worcestershire
1/2 tsp black pepper
kosher salt
2 oz crumbled blue cheese or gorgonzola
arugula, to serve
fresh hamburger buns

In a large bowl, combine ground meat with garlic, liquid smoke, Worcestershire, black pepper and salt. Mix well using your hands. Add in crumbled cheese and mix gently to incorporate. Portion out meat mixture into 3-4 balls, depending on the size of hamburger patty that you prefer. Gently pat the balls into round patties and use your thumb to indent the middle for more even cooking.

Place on a the upper grill rack of a medium-hot gas grill and cook for six minutes. Flip burgers and cook for another 3-4 min for a “medium” preparation. Burger thickness, your exact grill and your preference in preparation (ie, medium rare versus well done) will cause variance in cooking times to adjust according to your preferences.

Bacon Sweet Onion Jam
Adapted from Smells Like Home
5 pieces thick cut bacon, chopped into bite sized pieces
1 large sweet onion, halved and very thinly sliced
1 Tbsp brown sugar
1/3 C balsamic
1/3 C water
1/2 Tbsp stone ground mustard
kosher salt
black pepper

Heat a large saute pan over medium-high heat. Add the bacon and cook, stirring occasionally until browned but not crispy, about 6-7 minutes. Meanwhile, slice the onions – I like mine sliced paper thin for better caramelization. Remove the bacon from the pan and let it drain on a paper towel-lined plate. Stir in the onions, and season with salt and pepper. Cover the pan to cook the onions for 2 minutes. Uncover the pan and scrape any browned bits off of the bottom of the pan with a spatula or wooden spoon. Recover the pan and cook the onions for another 10 minutes, stirring occasionally, until the onions are soft and beginning to caramelize.

After the onions have cooked, stir in the balsamic vinegar, mustard, and water then return the bacon to the pan and bring the mixture to a simmer. Simmer uncovered until the sauce thickens and is almost completely absorbed, about 5-7 minutes. If using immediately, set it aside in a bowl until ready to use.

To serve: Place burger on the bun and top with jam and arugula.

bacon-onion-jam
blue-cheese-burger
katie

1 Comment

Filed under Garden, Grill

Easy Herbed Green Beans

In my attempts to broaden my gardening horizons I tried my hand at starting pole beans from seed, lured in by the appeal of an Italian heirloom variety called Trionfo Violetto.  Last year my seedlings got hijacked by some greedy rabbit or squirrel but this year, I have four strong plants. The first round of my purple beans was finally ready this week and they are a thing of beauty. Something about eating richly colored purple beans is just that much sexier than everyday green beans, don’t you think?

purple green-beans

Since my first picking had enough for a little over one serving, I happily snatched up some extra green and yellow beans at the weekend farmer’s market, already imagining the gorgeous Mardi Gras-like mix that would appear on our plates.

This recipe is so simple that it feels like a sham to even call it a recipe but may be my favorite way to eat green beans. The combo of freshly picked beans and bright herbs tastes like “garden” in all the best ways and why mess with that?

multicolored green beans

Herbed Green Beans
serves 2-3 but volume is easily increased
1/2 lb green beans
1/2 Tbsp olive oil
1 1/2 Tbsp fresh herbs (basil, mint, parsley & chives), chopped
freshly cracked black pepper
kosher salt

Wash and trim ends from green beans. Add beans to saute pan and drizzle with olive oil. Saute on medium heat for 5-7 minutes until beans are tender and just beginning to blister. While sautéing, season with salt and pepper. When beans have 1-2 minutes left, add chopped herbs. Serve warm.

green beans with herbs

katie

2 Comments

Filed under Garden, Healthy, Quick & Easy, Sides

Grilled Asparagus & Hakurei Turnip Panzanella

As the mercury creeps up, our CSA box and farmer’s market finds are starting to expand beyond greenery into heartier and more adventurous veg. Enter, hakurei turnips. While asparagus and I are well acquainted, these little white turnips were new to my table. Originally I had thought about just shaving them raw but had been craving a hearty panzanella lately so I detoured from my plan.

Panzanella makes for a fun, experimental salad (like most salads) where you can toss in whatever you’ve got handy. For this one, I ended up grilling everything but the spinach. The grilled hakurei turnips add an earthy-sweet element to the flavor mix.

Since this was dinner, I served the panzanella alongside my Bacon and Grilled Scape Risotto, also replete with grilled CSA treasure.

asparagus panzanella salad

Grilled Asparagus Panzanella
Serves 4
1 bunch stalks asparagus
1 bunch hakurei turnips
1/2 C shaved parmesan
2 medium tomatoes, thickly sliced
2 C fresh spinach
1 medium baguette, sliced in half laterally
olive oil
red wine vinegar (approx 1 Tbsp)
cracked black pepper
kosher salt

Trim asparagus ends and set aside. Trim off turnip greens and ends, then slice turnips into disks. Slice tomatoes and set aside.

I used a grill pan to do my grilling but you could certainly use a real grill. I would, however, recommend a grill basket for the smaller vegetables. Using a grill pan, add about 1 Tbsp olive oil to the pan and shift pan around to coat lightly. Add asparagus and turnips. Grill on medium heat for about 4 minutes or until grill marks begin to appear, then flip vegetables and repeat. Once both sides are nicely marked, remove and set aside on a cutting board.

Transfer baguette halves onto grill pan and grill for about 5 minutes, until bread developed a golden crust or grill marks. Set aside. Transfer tomatoes to grill pan and grill for about 2-3 minutes per side.

Roughly chop asparagus and tomato into large bite sized pieces. Slice baguette into large, crouton-like chunks. Add vegetables and bread to a large bowl. Toss with spinach and shaved parmesan. Drizzle lightly with red wine vinegar, cracked black pepper and salt. Toss to combine. If desired, toss with an additional drizzle of olive oil. Serve warm.

grilled panzanellakatie

2 Comments

Filed under Grill, Healthy, Quick & Easy

Easy Chicken Chilaquiles

Once upon a time, long, long ago I was a college student on a spring break trip in Mexico. Having been just introduced to the wonder that is “all-inclusive” I tried all sorts of interesting looking things at the various restaurants and buffets during the week, with one of those items being spicy, savory chilaquiles. I don’t know what randomly made me think of that one day but I did and decided I wanted to take a crack at making them.

As it turns out the key to chilaquiles is a good rojo sauce. Having never really made a rojo sauce before, I did the sensible thing and found a solid looking recipe as a starting point that I’ve since modified to better fit my tastes. I really love that this batch makes enough to support two meals. Besides the application below, I’ve used it as a mole base, as an enchilada sauce and as a slow cooking sauce for carnitas and it’s delicious all around. Turns out lots of things get better with a good rojo sauce.

Moving along to the main show, chilaquiles themselves come in many variations and flavor combinations and are traditionally eaten for breakfast or brunch. I happen to think they also make an excellent, easy weeknight dinner too and are a good way to mix up your standard “taco Tuesday”.
chicken-chilaquiles

All Purpose Rojo Sauce
makes enough for 2 meals
7 dried New Mexico chiles
1/2 C chile soaking liquid*
1/2 onion, roughly chopped
1 14.5 oz can crushed tomatoes
2 plum tomatoes, chopped
3 garlic cloves, chopped
1 jalapeño, seeds removed, chopped
1/4 teaspoon paprika
1 Tbsp honey
1 Tbsp ancho chile powder
1 tsp ground cumin
1/2 tsp kosher salt

*Place dried chiles in a bowl of warm water and let soak and soften for 15 minutes.
Meanwhile, add chopped onion, crushed tomatoes, plum tomatoes, garlic and jalapeno to a food processor and blend well until mostly smooth. Add spices and honey and pulse twice. Remove chiles from water and trim off stems. Shake out seeds if desired (many may just fall out, which is fine). Roughly chop chiles into large chunks and add to food processor. Blend until entire mixture is smooth. Reserve half of sauce. The rest can be refrigerated for up to a week or frozen for future use.

Chicken Chilaquiles
serves 2-3
3C tortilla chips
2C shredded rotisserie chicken
1/2 batch rojo sauce
1/2 C shredded cheddar cheese
1/2 C queso fresco or cotija cheese
3 green onions, chopped
2 Tbsp cilantro, chopped
4-5 eggs, poached
Cholula hot sauce, to taste

Preheat oven to 350. In a large bowl, add chicken, green onions, cheddar cheese and 1/2 of the reserved rojo sauce. Toss gently to combine ingredients.

Very lightly grease a 13×9 glass pan. Spread a thin layer of tortilla chips (you may wish to partially crush a few of them, depending on the shape of your chips) across the bottom of the pan. Top tortilla chips with chicken mixture. Crumble 1/4 C of cotija over chicken. Mentally divide remaining sauce into two portions and pour one of the “portions” evenly over the chicken and cheese. Repeat layers – chips, chicken mixture, cotija and sauce.

Bake for 25-30 minutes. While chilaquiles are baking, use your favorite method to poach your eggs. We use this odd Depression-era egg pan of my husband’s but here is an easy picture tutorial to get it right without a special pan. Take note that it only take about 4 minutes to perfectly poach an egg so you will want to wait until your chilaquiles are almost done to drop your eggs in.

Serve chilaquiles with 2 eggs per person and roughly chopped cilantro.

chilaquiles

katie

2 Comments

Filed under Main Dish, Quick & Easy