Category Archives: Cook

Grilled Asparagus & Hakurei Turnip Panzanella

As the mercury creeps up, our CSA box and farmer’s market finds are starting to expand beyond greenery into heartier and more adventurous veg. Enter, hakurei turnips. While asparagus and I are well acquainted, these little white turnips were new to my table. Originally I had thought about just shaving them raw but had been craving a hearty panzanella lately so I detoured from my plan.

Panzanella makes for a fun, experimental salad (like most salads) where you can toss in whatever you’ve got handy. For this one, I ended up grilling everything but the spinach. The grilled hakurei turnips add an earthy-sweet element to the flavor mix.

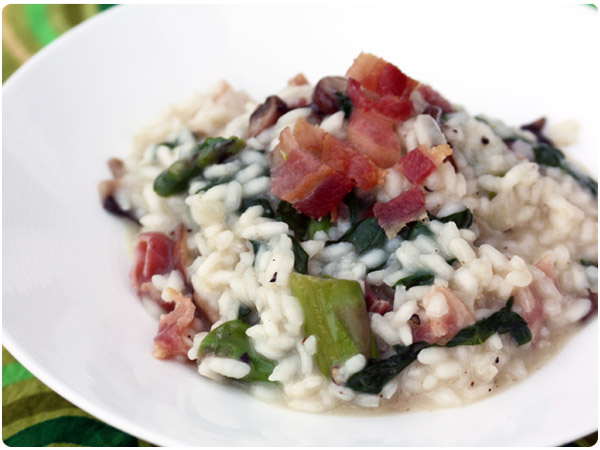
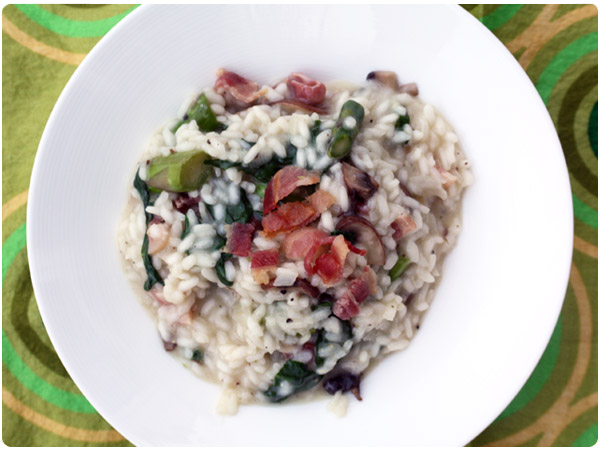
Since this was dinner, I served the panzanella alongside my Bacon and Grilled Scape Risotto, also replete with grilled CSA treasure.

asparagus panzanella salad

Grilled Asparagus Panzanella
Serves 4
1 bunch stalks asparagus
1 bunch hakurei turnips
1/2 C shaved parmesan
2 medium tomatoes, thickly sliced
2 C fresh spinach
1 medium baguette, sliced in half laterally
olive oil
red wine vinegar (approx 1 Tbsp)
cracked black pepper
kosher salt

Trim asparagus ends and set aside. Trim off turnip greens and ends, then slice turnips into disks. Slice tomatoes and set aside.

I used a grill pan to do my grilling but you could certainly use a real grill. I would, however, recommend a grill basket for the smaller vegetables. Using a grill pan, add about 1 Tbsp olive oil to the pan and shift pan around to coat lightly. Add asparagus and turnips. Grill on medium heat for about 4 minutes or until grill marks begin to appear, then flip vegetables and repeat. Once both sides are nicely marked, remove and set aside on a cutting board.

Transfer baguette halves onto grill pan and grill for about 5 minutes, until bread developed a golden crust or grill marks. Set aside. Transfer tomatoes to grill pan and grill for about 2-3 minutes per side.

Roughly chop asparagus and tomato into large bite sized pieces. Slice baguette into large, crouton-like chunks. Add vegetables and bread to a large bowl. Toss with spinach and shaved parmesan. Drizzle lightly with red wine vinegar, cracked black pepper and salt. Toss to combine. If desired, toss with an additional drizzle of olive oil. Serve warm.

grilled panzanellakatie

2 Comments

Filed under Grill, Healthy, Quick & Easy

Triple Berry Ice Cream

It finally feels like summertime here in the Midwest and no better way to kick off the sun-filled days than with a good dose of berries. We have yet to go on our annual strawberry picking outing, but I’ve been stacking my grocery cart with every berry the store has to offer.

For a refreshing and fun treat, I created a quick homemade triple berry ice cream using fresh strawberries, blueberries and raspberries. The recipe is easy – no cooking! – and perfect on a warm summer day.

Triple Berry Ice Cream

Triple Berry Ice Cream 
1 1/2 C chopped strawberries
1/2 C blueberries
1/2 C raspberries
1 lemon
3 TBSP sugar
1/8 tsp salt
2 C heavy cream

In a food processor, blend all three berries, the juice of one lemon and sugar. If you don’t have a food processor, you can use a blender or mash the berries by hand.

In a large bowl, mix blended berry mixture, heavy cream and salt. Refrigerate for 3 hours or overnight.

In an ice cream maker (I used the KitchenAid ice cream attachment), add cold mixture according to directions. Churn until thick.

Serve immediately for a soft serve texture or freeze in a container for a harder texture.

Homemade Triple Berry Ice Cream

This recipe makes about 10 servings.

Happy Summer!

It’s Summer Fest with our friends over on Food Network! Check out some of these other great breakfast, dessert and drink berry recipes from fellow bloggers around the web.

Feed Me PhoebeGluten-Free Blueberry-Almond Pancakes
The Lemon BowlStrawberry Mango Chia Smoothie
Dishin & DishesCrunchy Topped Blueberry White Chocolate Muffins
Jeanette’s Healthy LivingGingered Blueberry Shortcakes With Light Creamy Topping
Taste With The EyesBlueberry Limoncello Pavlova
Sweet Life BakePaletas de Fresca y Aguacate
Napa Farmhouse 1885Mixed Berry Tea Cake 
Red or Green?Strawberry & Blueberry Crisp (Red or Green-style)
Virtually HomemadeBlueberry Mint Margaritas
Pinch My SaltStrawberry Peach Cobbler With Almond Biscuit Topping
Cooking With EliseDehydrating Blueberries, Plus Blueberry and White Chocolate Cookies
DevourFour Healthy Berry Recipes
Domesticate MeSummer Berry Crisp
WeeliciousBrainy Breakfast
The Sensitive EpicureStrawberries With White Balsamic Vinegar Caramel, Orange Zest and Black Pepper
Daily*DishinFresh and Easy Blueberry Pie
From My Corner of SaratogaMixed Berry Freezer Pops
FN DishWake Up With Berries

stef

17 Comments

Filed under Treats

Easy Chicken Chilaquiles

Once upon a time, long, long ago I was a college student on a spring break trip in Mexico. Having been just introduced to the wonder that is “all-inclusive” I tried all sorts of interesting looking things at the various restaurants and buffets during the week, with one of those items being spicy, savory chilaquiles. I don’t know what randomly made me think of that one day but I did and decided I wanted to take a crack at making them.

As it turns out the key to chilaquiles is a good rojo sauce. Having never really made a rojo sauce before, I did the sensible thing and found a solid looking recipe as a starting point that I’ve since modified to better fit my tastes. I really love that this batch makes enough to support two meals. Besides the application below, I’ve used it as a mole base, as an enchilada sauce and as a slow cooking sauce for carnitas and it’s delicious all around. Turns out lots of things get better with a good rojo sauce.

Moving along to the main show, chilaquiles themselves come in many variations and flavor combinations and are traditionally eaten for breakfast or brunch. I happen to think they also make an excellent, easy weeknight dinner too and are a good way to mix up your standard “taco Tuesday”.
chicken-chilaquiles

All Purpose Rojo Sauce
makes enough for 2 meals
7 dried New Mexico chiles
1/2 C chile soaking liquid*
1/2 onion, roughly chopped
1 14.5 oz can crushed tomatoes
2 plum tomatoes, chopped
3 garlic cloves, chopped
1 jalapeño, seeds removed, chopped
1/4 teaspoon paprika
1 Tbsp honey
1 Tbsp ancho chile powder
1 tsp ground cumin
1/2 tsp kosher salt

*Place dried chiles in a bowl of warm water and let soak and soften for 15 minutes.
Meanwhile, add chopped onion, crushed tomatoes, plum tomatoes, garlic and jalapeno to a food processor and blend well until mostly smooth. Add spices and honey and pulse twice. Remove chiles from water and trim off stems. Shake out seeds if desired (many may just fall out, which is fine). Roughly chop chiles into large chunks and add to food processor. Blend until entire mixture is smooth. Reserve half of sauce. The rest can be refrigerated for up to a week or frozen for future use.

Chicken Chilaquiles
serves 2-3
3C tortilla chips
2C shredded rotisserie chicken
1/2 batch rojo sauce
1/2 C shredded cheddar cheese
1/2 C queso fresco or cotija cheese
3 green onions, chopped
2 Tbsp cilantro, chopped
4-5 eggs, poached
Cholula hot sauce, to taste

Preheat oven to 350. In a large bowl, add chicken, green onions, cheddar cheese and 1/2 of the reserved rojo sauce. Toss gently to combine ingredients.

Very lightly grease a 13×9 glass pan. Spread a thin layer of tortilla chips (you may wish to partially crush a few of them, depending on the shape of your chips) across the bottom of the pan. Top tortilla chips with chicken mixture. Crumble 1/4 C of cotija over chicken. Mentally divide remaining sauce into two portions and pour one of the “portions” evenly over the chicken and cheese. Repeat layers – chips, chicken mixture, cotija and sauce.

Bake for 25-30 minutes. While chilaquiles are baking, use your favorite method to poach your eggs. We use this odd Depression-era egg pan of my husband’s but here is an easy picture tutorial to get it right without a special pan. Take note that it only take about 4 minutes to perfectly poach an egg so you will want to wait until your chilaquiles are almost done to drop your eggs in.

Serve chilaquiles with 2 eggs per person and roughly chopped cilantro.

chilaquiles

katie

2 Comments

Filed under Main Dish, Quick & Easy

Avocado Cashew Chicken Salad

I have an obsession with two ingredients. Greek yogurt and avocado. I use plain greek yogurt in pretty much everything I make (my husband can attest) and have become a fan of pretty much any dish paired with avocado. I love a good chicken salad, especially as the weather begins to warm up (finally!). This chicken salad combines my two favorite add-ins to make a creamy, healthy dressing for the chicken. Eat this chicken salad on a croissant, atop a bed of fresh greens or all by itself! This is a great dish to bring to a picnic, although you cannot make it too far ahead of time or the avocado with turn a brownish hue. So add the dressing right before serving!

Avocado Cashew Chicken Salad

Avocado Cashew Chicken Salad
1 lb. cooked and shredded skinless, boneless chicken breast (or rotisserie chicken), cooled
2 stalks celery, chopped
1/2 green pepper, chopped
1/4 c. dried cranberries
1/4 cashews, chopped
1 avocado
1/3 C plain fat-free Greek yogurt
1/2 tsp cumin
1/2 tsp coriander
salt and pepper to taste

Combine chicken, celery, green pepper, cranberries and cashews in a large bowl. In a separate bowl, mash avocado. A fork should suffice for a ripe avocado, but you may want to process it if it is a bit firm. Add yogurt, cumin, coriander, salt and pepper and mix thoroughly. Add to chicken mixture and fold together until all ingredients are covered. (Make sure to cool the chicken as to not melt the yogurt).

I hope you are all enjoying the entrance of spring and hints of summer as much as we are!

stef

4 Comments

Filed under Cook, Healthy, Main Dish, Sides

Simple Roasted Vegetables

My 1 year old daughter is a true veggie lover.  She especially loves anything that is roasted.  After making her many batches of roasted veggies I realized that I almost forgot just how good a simply roasted vegetables can be.  Sometimes we get so consumed by making a recipe unique, adding all kinds of sauces or spices, that we forget that a vegetable in its truest form is actually very delicious, and good for you!  I have found that using coconut oil helps to bring out the sweetness.  I understand that this recipe is not necessary earth shattering, but hopefully it will inspire you to rediscover the simplicity of roasted vegetables.

roasted

Roasted Carrots and Zucchini

4 large carrots, pealed and sliced into even sized pieces.
1 medium sized zucchini sliced into evenly sized pieces
2-3 tablespoons melted coconut oil
Sea Salt
Pepper

Preheat your oven to 400 deegrees.  Place your cut up veggies in a bowl and drizzle with the melted coconut oil.  Toss until all of the veggies are coated.  The coconut oil will probably harden slightly onto the carrots and zucchini and that is ok.  Sprinkle with salt and pepper.

carrots and zuchini pre baking

Lay out on parchment paper or a silicone baking sheet and roast for 20-30 minutes turning every 10 minutes.

Remove when brown around the edges and tender.

anne

Leave a comment

Filed under Cook, Kid Friendly, Sides

Baked Fish Tacos with Creamy Tomatillo Salsa

Yesterday for Cinco de Mayo I was lucky to have some fresh fish to work with for these tasty, tangy baked fish tacos. Fish tacos are a regular in our repertoire but lately we’ve been baking them instead of frying them. With a substantial panko crust, they taste just as good with a bit less guilt. I used fresh pan fish but tilapia or any readily available white fish would be delicious. Shrimp would also be a great choice.

I served the fish tacos with a homemade creamy tomatillo salsa, with the bright flavors lending themselves well to seafood. I like to add avocado to my version since the richness of the avocado helps balance out the tang of the tomatillos.  Add in some sweet carrots, crunchy cabbage and peppery radishes and you have the perfect spring meal.
baked-fish-taco1

Baked Fish Tacos
makes 4 small tacos
12 panfish filets or 1 lb tilapia, cut into bite-sized pieces
1 C panko bread crumbs
1/3 C shredded parmesan cheese
3 Tbsp butter, melted
1/4 tsp cumin
1/4 tsp salt
1/8 tsp garlic powder
1/8 tsp chipotle or chili powder
cracked black pepper

Preheat oven to 350. Grease a cooking sheet or glass pan and set aside. In a medium bowl or large Ziploc bag, combine panko, parmesan and spices. Stir or shake to combine. Melt butter in a small bowl. Dip fish filets lightly in butter, then toss in breading mixture to coat. Set on cooking sheet. Bake for 20-25 minutes depending on thickness of filets. Fish should be white and flaky when fully cooked.

2 radishes, very thinly sliced
1 C chopped cabbage
1/2 C matchstick carrots
1 Tbsp olive oil
1/2 Tbsp lime juice
pinch of salt
4 small tortillas
chipotle mayo

In a medium bowl, add cabbage, carrots and radishes. Drizzle on olive oil and lime juice, tossing to combine. Season with salt and toss again.

Serve baked fish with warm tortillas, chipotle mayo, tomatillo salsa and hot sauce.

baked-fish-taco

Creamy Tomatillo Salsa
6 medium tomatillos, quartered
1/2 avocado
1/2 small onion
1/2 jalapeno, seeded
2 cloves garlic
1 lime, juiced
1 handful cilantro
1/2 tsp kosher salt
1/8 tsp cayenne

Add tomatillos, avocado, onion, jalapeno, garlic, cilantro and lime juice to a food processor. Process until blended and just barely chunky. Add salt and cayenne and pulse two more times. Add additional salt or cayenne to taste if desired.
tomatillo-salsa
katie

1 Comment

Filed under Healthy, Main Dish, Quick & Easy

Salted Caramel Cupcakes

Salted Caramel is all the rage these days.  I honestly had never really tried the combo but after hearing about it over and over again I decided to go for it.  I made a basic vanilla cake very similar to Katie’s Lemon Cupcake recipe except I added caramel creamer instead of lemon and played around with the icing until I got it just right.  One bite of these salted caramel cupcakes and I instantly figured out what all the fuss was about.

salted caramel cupcakes

Seriously, the addition of salt is genius.  It makes all of the flavors pop.  I was somewhat hesitant to add sea salt on top of the cupcakes, but once I did and gave it a try I was hooked.

salted caramel cupcake

Salted Caramel cupcakes

Caramel Cupcakes
1 1/2 Cups self-rising flour
1 1/2 Cups all purpose flour
1 Cup Butter
2 Cups sugar
1 tsp Vanilla
4 eggs
2/3 Cup Caramel Coffee Creamer (you could use half and half if you don’t have the creamer)
1/3 cup Half and Half

Preheat oven to 350 degrees.  Line 2 standard sized muffin tins with 24 liners.  Combine flours together and whisk.  Set aside.  In a large bowl, cream the butter and sugar.  Add the eggs one at a time, beating after each addition, then the vanilla.  Add the flour in 3 batches, alternating with the the half and half and creamer as you go.   Spoon the mixture evenly into the lined muffin tin.  Bake for 15-17 minutes.  Let cool.

Salted Caramel Frosting
1 cup softened butter
1 cup caramel topping
6-8 cups powdered sugar
3-6 Tbsp milk

cupcake topping
1/2 cup caramel topping for drizzle
Sea Salt

Blend the butter and caramel topping together until creamy.  Add powdered sugar 1 cup at a time, adding small amounts of milk as you go in order to reach the right consistency.  Beat until creamy.  Frost the cooled cupcakes.  Drizzle with caramel and top with a pinch of sea salt.

up close


anne

2 Comments

Filed under Cook, Treats

Spring Vegetable Risotto with Bacon

I’m dying for it to be spring but it is just sooo not. Regardless, I’m applying a mind over matter attitude by whipping out the bring colors, faux tanned bare legs (not my best decision ) and lighter spring dishes in the kitchen like this spring vegetable risotto. I used some of my favorite spring flavors like bright asparagus, earthy mushrooms and fresh spinach, plus added in a little bacon for some smokiness. Spring may not be here yet but with a few more dinners like this one, it’s only a few stirs away.
spring-risotto1

Spring Vegetable Risotto with Bacon
1 1/2 C arborio rice
1 Tbsp olive oil
1 very small onion, diced
1 C white wine
4 C chicken stock
7-8 stalks asparagus, chopped
1 C baby bella mushrooms, chopped
2 C fresh spinach, chopped
6 pieces bacon (optional)
1 Tbsp butter
1/2 C grated parmesan cheese
cracked black pepper
kosher salt

In a large sauce pan, add olive oil, arborio rice and onions and begin to toast over medium heat for about 1 minute. Add in white wine and cook, stirring occasionally until most of the liquid has been absorbed by the rice. Add 1 C stock, continuing to stir until liquid is again absorbed. Repeat process, continually adding stock and stirring until it is absorbed. When most of the liquid is gone, test rice. It should be slightly al dente and creamy.

Meanwhile, add chopped asparagus to saute pan and drizzle lightly with olive oil. Cook over medium heat for about 5 minutes and add mushrooms. Cook for another 2-3 minutes until mushrooms begin to soften. Season with salt and pepper. Add spinach and reduce heat to medium-low. Continue cooking until spinach is wilted.

Meanwhile, cook bacon according to your favorite method. When I have multiple pans going, I like to microwave my bacon. To do so, place 2 paper towels on a plate and cover with bacon. Place one paper towel on top. Cook for about 6 minutes. Chop into small bites.

Transfer vegetables and bacon into risotto and reduce heat to low. Fold in parmesan until it melts. Cut butter into four small squares and fold into risotto. Season with additional salt and cracked pepper.

spring-risotto2

katie

3 Comments

Filed under Main Dish

Broccoli Cheesy Rice

I’m constantly searching for new side dishes that are fast, easy and kid-friendly. There is something to be said about a good side dish that uses items that are already in your cupboard or your refrigerator. This broccoli cheesy rice is a great side to any grilled or pan seared protein like pork chops or chicken breast. I always find myself sneaking the spoon to add a little extra to my plate.

Broccoli Cheesy Rice

Broccoli Cheesy Rice
1 TBSP extra virgin olive oil
1 C long grain white rice
2 C chicken stock
1 C fresh or frozen broccoli, chopped
1 C shredded cheddar cheese
3 TBSP milk
1/2 tsp salt

In a large sauce pan, heat olive oil. Add white rice and sauté until lightly golden, about 5 minutes. Add chicken stock and heat until boiling. Reduce to simmer and cover, 15 minutes.

Lightly steam broccoli on stovetop or heat in microwave for three minutes and chop.

Remove rice from heat, add broccoli, cheese, milk and salt and stir until cheese is melted.

Broccoli and Cheese Rice

Enjoy!

The folks at Food Network are dishing up sides all spring! Check out these other “From the Pantry” side dish links from fellow bloggers around the web:

Feed Me PhoebeTropical Trail Mix With Ginger and Coconut
The Cultural DishGreen Bean Salad
Jeanette’s Healthy LivingEasy Roasted Tomatoes and Spring Asparagus
Napa Farmhouse 1885Pizza With Kale-Walnut Pesto, Sun-Dried Tomatoes and Pickled Garlic
Red or Green?Spring Greens With Homemade Vinaigrette
The Sensitive EpicurePasta alla Ghetto Fabuloso (Gluten-Free and Milk-Free)
Dishin & DishesScalloped Sweet Potatoes
Made By MichelleBroccoli Quiche With Homemade Bisquick
FN DishPantry-Friendly, Budget-Friendly Side Dish Recipes

stef

4 Comments

Filed under Cook, Sides

Chipotle Rosemary Spiced Nuts

There’s a lot of talk these days about whether women can “have it all” – the job, the family, the friends, the happiness. While I have plenty of thoughts on the topic as a full-time working mom (yes you can! why is this even a question? how come guys don’t worry about this? check those perfectionist tendencies at the door…) I won’t get too soapbox-y on you guys here because that’s not really the point of this blog. However…regardless of what you think about bigger “have it all” topics, you CAN have it all in this ultra delicioso snack. Who can resist salty-sweet-spicy-savory combos? I mean, really.

I made these nuts awhile back for a party and had several requests for the recipe. I can’t take credit for the combo but the layered flavors are addictive beyond belief.

chipotle-rosemary-nuts2

slightly adapted from Barefoot Contessa

Chipotle Rosemary Spiced Nuts
2+ Tbsp Vegetable oil
2 C whole cashews (14 ounces)
1 1/2 C whole pecan halves (12 ounces)
1 C whole almonds (8 ounces)
1/4 C pure maple syrup
1/4 C light brown sugar, lightly packed
3 Tbsp freshly squeezed orange juice
1 tsp chipotle chili powder
3 Tbsp minced fresh rosemary leaves
4 tsp kosher salt

Preheat the oven to 350. Brush a cookie sheet evenly with vegetable oil. Mix nuts in a large plastic bowl. In a small bowl or glass measuring cup, combine 2 tablespoons of vegetable oil, maple syrup, brown sugar, orange juice and chipotle powder and whisk well. Pour over nuts and toss to coat. Add 2 tablespoons of rosemary and 2 teaspoons of salt and toss again.

Spread the nuts evenly on the greased cookie sheet. Roast for 35 minutes, stirring twice with a large metal spatula, until the nuts are glazed and golden brown. Remove from the oven and sprinkle with final teaspoon of rosemary and salt. Toss lightly with the spatula, stirring occasionally to prevent nuts from sticking as they cool. Let cool completely and store in airtight containers at room temperature for up to a week.
chipotle-rosemary-nuts
katie

Leave a comment

Filed under Appetizers