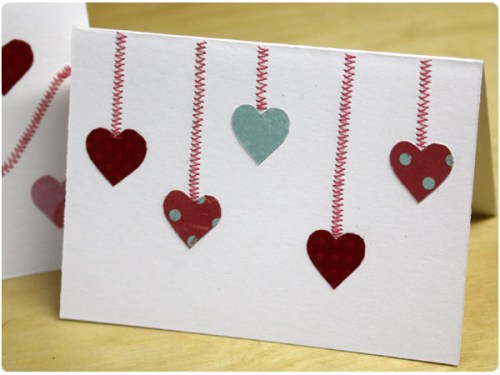
Making valentines is one of those project that immediately brings you back to your childhood or spending time with your children. Lately I’ve been smitten by things featuring stitched details so I thought it would be fun to recreate that youthful feeling by making valentines with this charming theme. So a few weeks ago my mom and I spent an afternoon chatting and stitching away – she showing me the best ways to machine sew while I stitched along by hand.
This project takes time but if you’ve got an afternoon to chat with friends or family as you sew, you’ll hardly notice!
What You’ll Need:
package of small cards & envelopes
OR
plain cardstock cut to size for separate envelopes
a variety of colored cardstocks or scrapbooking papers
1-2 pieces of scrap paper
glue stick or rubber cement
all purpose thread
needle and/or sewing machine
embellishments of choice – ie. sequins, ribbon, twine
1. If you’ll be using cardstock, start by cutting your cardstock down to fit in the envelope. I swapped the cheap-o cards I bought for cardstock and trimmed them to 5×7 size to fit as 3 1/2×5″ cards in the envelopes using a small paper cutter.
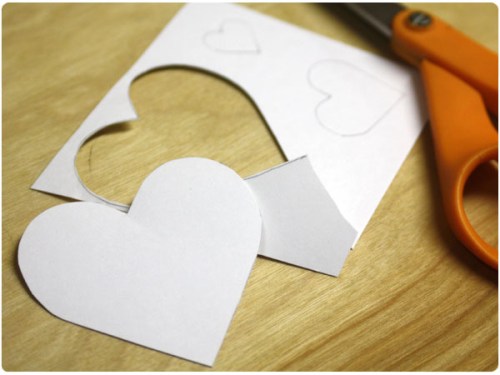
2. Create your heart shaped tracing templates by folding a piece of scrap paper in half and cutting out hearts in various sizes. Unfold each heart and examine it. Refold and trim to adjust the shape as desired. The templates allow you to get symmetrical shapes without having folds in the “good” hearts you’ll use for your cards.

3. Next, use your templates to trace a number of “good” hearts on your colored cardstock and scrapbooking papers. Trace on the opposite side of the paper as what you will want showing on the card. Cut out hearts. You should be able to cut 2 hearts for each one you trace by stacking up paper and cutting through both to save time.
4. Glue the hearts onto the folded cards in a variety of designs (exception: sequined heart – see below).
For Machine Sewn Cards:
Use a pencil to lightly trace a word, swirl or lines on the card. Open card flat and use a needle and thread to hand-stitch over your design or a sewing machine with a zig zag stitch to slowly sew over the design. With the sewing machine, work slowly, turning the paper to achieve smooth curves. As you finish the design, pull the threads through to the inside of the card. Snip them and knot them several times to secure in place. Gently erase pencil marks.
For Hand Sewn and Sequined Cards:
For the sequined card, lightly trace a large heart template on the inside of the front of the card. Knot your sewing or embroidery thread and poke the needle from the backside of the card through the bottom point of the heart. String on a sequin. Hold the card up to the light to find your pencil outline and poke back through in a small running stitch. Repeat. Don’t worry if the stitches are imperfect…it’s part of the charm!
I recently discovered that my blog friend, Nikki (who can sew me under the table) was on the same wavelength this year. Check out her blog, Nikki, In Stitches for more handsewn valentine ideas!


 Subscribe by Email


Ok…these are ADORABLE!!!
Isn’t it great that we both decide to “sew” our Valentine’s this year, and they end up so different, yet both so amazing??
Yours are fantastic! The zig-zag is the perfect stitch choice!
And I can “sew” not sew you under the table!!
XOXO
Nikki
how sweet are these?! i might have to recruit my mom to make a few (she has a sewing machine). happy monday ladies! xoxo jcd
Pingback: Tweets that mention Sew Sweet Valentines | -- Topsy.com
It’s times like these I wish I had a sewing machine. I LOVE these!
Alysha @ Shesontherun.com
Your Valentines are so adorable! I have stitched designs onto cards before, but they didn’t look quite as cute as yours. I should give it another try now with this fresh inspiration.
I love this! I also think it would be a fun way to create in a larger scale to make Valentine-themed wall art.
Pingback: DIY Valentine Chalkboard Decor |