Category Archives: DIY

Best Haute Posts of 2010

2010, what a great year it’s been! We are so grateful to have shared this past year with you. We’ve learned so much and plan to use that knowledge to bring you bigger, better ideas in 2011.

So to bid 2010 adieu, we thought we would leave your (and our) favorites:

Top 10 Posts of 2010

10. Babies, babies, babies! With the arrival of Lincoln James this year, Stef was lucky enough to experience these two fabulous baby showers: Lions and Tigers and Bears, Oh My! and the Bird’s Nest Baby Shower

9. Two words: goat cheese. Mix it up with Anne’s Goat Cheese, Apple and Pine Nut Pizza.

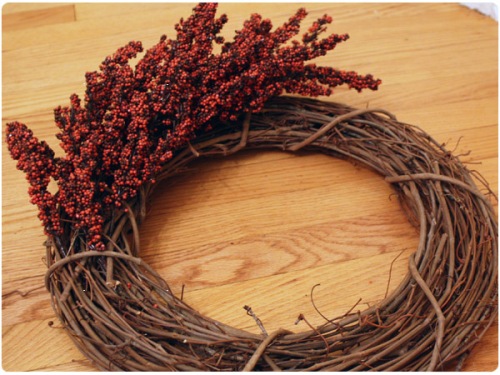
8. No need to spend mega bucks buying a wreath for your door. Katie’s Fall Berry Wreath or Stef’s Winter Sweater Wreath provide a great look on the cheap.

7. Who knew brussel sprouts were so hot right now? Braised Brussel Sprouts with Bacon.

6. Kiddos love the Pink and Brown Ladybug Party and the Campfire Birthday Party.

5. Apparently everyone is asking at parties around the country: Have you tried the grape salad?

4. Move over Pottery Barn. DIY Moss Topiary for a fraction of the cost.

3. Wedding bells took over June on Haute Apple Pie with a Naughty and Nice Bachelorette Party and a Summertime Lemonade Shower.

2. As featured with our friends over at Foodpress.com: Chicken and Black Bean Chili

1. We have some eager to learn readers. Katie’s How to: Refinish a Dresser and Anne’s How to: Painting Kitchen Cabinets (as seen on Freshly Pressed) were a big hit!

3 Comments

Filed under Cook, DIY, Entertain

{Free Download} Christmas Typography Sign

Only one more sleep ’til Christmas Eve, have you finished your shopping? If you are struggling for a last-minute gift or looking to add a little Christmas cheer to your house, we may just have a solution for you.

I’ve been inspired by the many signs I’ve seen in store and online showcasing the wonderful art of typography. Artistic subway signs always seem to catch my eye. So this Christmas, I decided to make one for myself using all of my favorite Christmastime phrases. And now you can have it to…for free!

To showcase this in your house or to assemble it and give it as a gift, simply download the PDF file here. Print it at home or at your neighborhood printer. You can purchase or create your own mat. I bought a red and white mat at Michaels and inserted it into a simple white metal frame. It found its perfect place propped up on my leaning bookshelf amongst some Christmas nesting dolls.

Wishing all of you a very blessed Christmas, from our haute homes, to yours.

2 Comments

Filed under Decorate, DIY, Holidays

Quilled Paper Ornaments

My family is big on ornaments. Growing up our tree was a hodge-podge of vacation finds from around the world, antique pieces and homemade treasures. But for as long as I can remember, these little paper snowflakes made an appearance on my parent’s tree. I’ve always liked the look of them but never knew where they came from until a few years ago.


The History
Turns out, my mom had made these “paper quilling” ornaments when she was first married. With my dad in grad school and my mom a teacher, funds were tight but she still wanted a pretty tree. While only a few are left, they’re now a sweet reminder of the fact that beauty doesn’t have to cost much. Romantic, right?

According to my brief research, paper quilling – or paper filigree – has been an artform for over 500 years. Long ago it was done as a way of embellishing religious documents and later, in the 18th century and Victorian eras, as a suitable artform for proper young ladies(1).

How To:
Paper quilling is fairly easy and mindless, although it can be time-consuming. It’s a good thing to do while watching TV. Basically you just roll the strips of paper into shapes and glue them together. Different shape combos of circles, scrolls, teardrops and such make up different snowflake patterns.

You’ll Need:
1/4″ strips of paper (or a quilling kit)
school glue
a tiny paintbrush, darning needle or something similarly sized

I would recommend buying a kit or two online to get started. They come with instructions, paper and design templates. After you get the hang of it you could make up your own designs.

Bonus Idea!
I’ve also decorated a few of this year’s gifts with my quilled ornaments, which is a fun way to pretty up your gift wrap and give an extra little present at the same time.

(1) Sources: Custom Quilling, Gem State Quilling.

48 Comments

Filed under Decorate, DIY, Holidays

DIY Winter Wreath

This may make me less of a haute homemaker and I am a bit reluctant to share this with you, but I have no idea how to sew. This is no exaggeration. I have never threaded a needle, I’ve never sewn a button on a shirt. While I have dreams of winning Project Runway, I know it won’t happen in this lifetime. So while wandering around JoAnn fabrics, I decided to embark upon a quest of creating a winter wreath for my front door. With this wreath, I hope to fool all who enter that I am able to sew.

Possibilities are endless with this wreath. You can use Christmas fabrics and yarn or fall fabrics or all neutrals with burlap for a little bit of a rustic feel.

What you need:

12 inch foam wreath form
3 packages of yarn
floral wire
ball pins
2-3 different types of fabric
scissors

What to do:

Start by wrapping all three packages of yarn around the wreath form. (This is a bit time-consuming, wrap while watching Dancing with the Stars, it goes by faster).

Once the yarn wrapping is completed, begin cutting fabric circles with approximately 4-5 inch diameters. The circles do not need to be perfect. My wreath incorporated 20 or so circles.

To create fabric flowers, pinch middle of circle and gather at the bottom.

Using about an inch and a half of floral wire, wrap it around the bottom of the fabric.

To fix the flowers to the wreath, stick a pin straight through the center of the flower and press into the wreath form.

Alternate patterns. Fix as few or as many flowers as you would like to create the look you want.

To hang the wreath on my front door, I looped a piece of floral wire, twisting it at the bottom, slid a pin through it and inserted into the back of the wreath. If you wish to have it hang lower, you could tie it up using leftover fabric or thick ribbon.

So whether you can sew or not, this wreath may have your friends thinking you can! I plan to have this wreath warm up my front door all winter long.


7 Comments

Filed under DIY

Retail Replicate: Fall Berry Wreath

With hints of cool air making sneak appearances in the mornings lately, I’m getting antsy for fall. Enough with the humidity and mosquitos and onto apple cider, crackling fires and cozy sweaters!

Since that might be a little premature still, I satisfied my autumn itch by making a fall wreath for my front door. Every year I see pretty wreaths all over retail-land…for beaucoup bucks. I have a hard time justifying $50+ for a wreath, even if it is reusable. So with the fall florals on sale at the craft store last week I was suckered into a bagful of scarlet faux berry branches (which my nature-loving husband informed me are staghorn sumac replicates) and wreath supplies for a total of about $18. I had never tried to make a wreath before but it turned out to be SUPER easy.

fall wreath berries

What You’ll Need:
18″ grape vine wreath
10-12 floral branches*
1/2 yd burlap
needle & beige thread
wire cutters
2 small safety pins

Use the wire cutter to clip off the individual sumac branches from each bunch. Push each branch in between the branches of the wreath, working so that the branch tips point in the same direction. Try to push each branch in as tightly as possible.

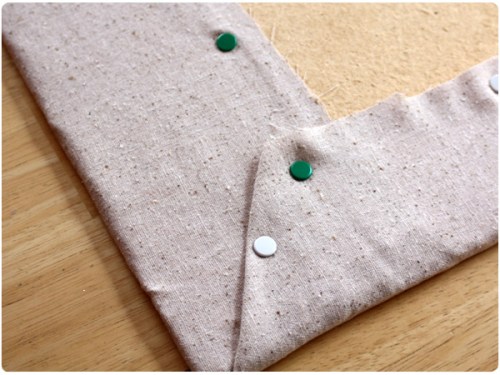
Cut two strips of burlap, approximately 3-4 inches wide. Tie one into a large, loose bow and set aside. Wrap the other around the wreath as a hanger. Match up the ends of the strip and fold over. Use safety pins to affix the bow onto the burlap hanger strip, lining it up with the wreath itself. Then, use a simple running stitch to secure the fold, sewing about 1/2″ from the edge.

* Note: You may need more or fewer branches depending on the floral you use and the look you’re going for.

DIY autumn wreath

30 Comments

Filed under Decorate, DIY

How To: Painting Kitchen Cabinets

When we moved into our new house, I knew repainting the kitchen cabinets would be a top priority.  I also knew that using a paint sprayer was the way to do it, however I was hesitant considering I had heard horror stories from everyone who has ever tried to use a paint sprayer.

Luckily I have a amazing father-in-law who stepped in and spent the entire weekend tackling this project with us.  He had some tips and tricks up his sleeve to get the paint sprayer to cooperate and used it without a single sputter!

I will say, the project was somewhat of a hassle, but the results were amazing.  With the help of a new kitchen sink, dishwasher and floor, the kitchen looks instantly updated.

Here are the cabinets before we painted them:
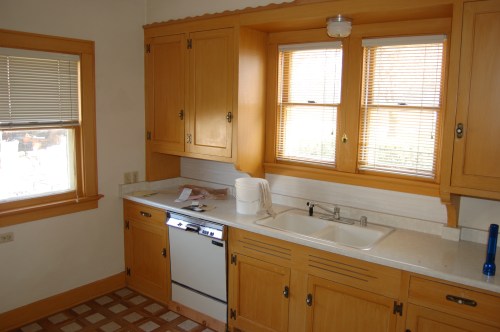
And after:

You will need:

Good quality latex primer (we used Benjamin Moore)
Good quality latex paint  (we used Benjamin Moore)
air compressor
spray gun
sand paper
water
respirator

Prep Work

First, you will want to take down all of your cabinet doors.  It helps to label them so you don’t mix them up.  Although they might all look the same size, each one can be just a little different.  You will then want to sand the surface just enough to scratch it up so the paint has something to grab hold of.

Remove all of the hinges and door handles. Be sure to save the hardware whether or not you plan to reuse it. You never know what kind of problems you will run into when you go to reinstall the doors.

Once the cabinets are prepped, wipe them down with a damp cloth to remove dirt and dust and let them dry completely before you start painting.

Next, tape off anything you do not want painted.  It helps to tape newspaper between the cabinets, over the counter tops and sink and on the walls.  Here is a picture of our kitchen taped off with the first coat of primer on the cabinets.
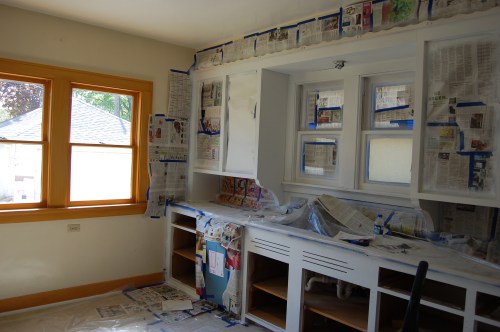
Setting up the paint sprayer

Once you hook up your paint sprayer to your air compressor, you can start to prep your paint.  Latex paint is too thick to be used in the paint sprayer by itself and will cause it to sputter and clog if you do not thin it out.  Depending on what kind of paint you use, the ratios may be different, but we mixed 3/4 parts paint with 1/4 parts water.  That got the paint to a good consistency for the paint sprayer.  Keep in mind, oil based paint should be thinned with paint thinner, but latex paint should be thinned with water.

Next, you will want to fill the paint sprayer and test it on a piece of cardboard to get comfortable with how it works. The sprayer will let you adjust the kind of spray you want and the air compressor will let you adjust the pressure.  Keep in mind this will take some trial and error.  We went to the garage and tested it on a piece of cardboard until we were comfortable with the way it sprayed. You want it thick enough that it covers, but not so thick that it causes paint runs.

Painting the Cabinets
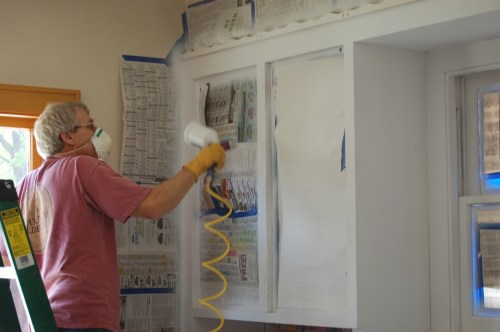

Now you are finally ready to start painting. Be sure to read all of the information that comes with the paint sprayer and follow the directions. You should also wear a respirator while painting.

Start with your primer and spray one thin, even coat on the cabinets. Allow this layer to dry completely before you add another layer.  To paint the cabinet doors that have been removed, just set up a paint shop outside or in your basement and spray the doors the same way you are painting the cabinets.

Let each layer dry for at least a couple hours before you add another layer of paint. Don’t let paint sit in the sprayer while you wait for the layers to dry. You will want to rinse it each time to ensure it does not dry and ruin the sprayer.

Once you have the cabinets primed, continue to paint with your paint color each time putting on a thin, even coat. Our cabinets took 1 coat of primer and 2 coats of paint.

Putting the cabinets back together

Let the cabinets dry completely before you attempt to put them back together.  If you have a hard time installing the doors and making them level, it is helpful to slip a piece of cardboard under the bottom of the door while you drill it to the hinges.  That will keep it level and prevent it from being installed at an angle.

Once your cabinets are up, step back and admire your work!

Although painting cabinets is a slow and sometimes tedious process, your hard work will definitely pay off.  It is an inexpensive way to freshen up your kitchen!

Good Luck with your home projects!

55 Comments

Filed under Decorate, DIY

How To: Pretty Inspiration Board

I’ve been deep in the trenches of turning my lackluster guest bedroom into a more sophisticated guest bedroom/office space. One of the key objectives was to create a space that would fuel creativity for the design work and many crafty projects that I do at home and there’s no better way to do that than with a DIY inspiration board!

I found the frame at Goodwill months ago but hadn’t been quite sure what to do with it.  Finally with the inspiration board in mind, I ditched the blah artwork and transformed the frame into a pretty and functional creative center by covering an old bulletin board with some nubby, neutral fabric.

inspiration board

Need some inspiration of your own?  Use the instructions below:

What You’ll Need:
empty picture frame
high gloss spray paint
drop cloth
bulletin board
box cutter
1 yd fabric*
staple gun or thumb tacks
1/8″ offset frame clips
sawtooth frame hangers
*Adjust the yardage based on the size of your bulletin board.

1. Spread out your drop cloth in a well-ventilated area. Spray paint your empty picture frame. Dry and spray a second coat. Dry.
2. Measure the inside of your frame. Transfer the measurements to the center of your bulletin board, marking off cutting lines to fit inside the frame.
Tip: Just buy a cheapo bulletin board from Target or a craft store…or use one you already have. It doesn’t need to be nice since you’ll be cutting it apart.
3. Carefully and slowly use a box cutter to cut through the bulletin board along the cutting lines. Cut each side and pop the piece out. Scrape any messy edges so that the edges are fairly smooth.
Tip: Since you’ll be cutting through the board with some pressure, be sure to cut on a safe surface that you don’t mind poking or scratching. I did it on the floor in my basement.
4. Iron your fabric and stretch it out on a large flat surface. Place your bulletin board on top of the fabric, cork side down.
5. Start by folding the fabric over the edges of the board, leaving a few inches beyond the edge. Trim excess if necessary. Fold in the corners to form right angles and pull the fabric tightly across the back of the board. Secure with a thumbtack or a staple gun. Repeat for each side of the board.

DIY Idea Board
6. Press covered bulletin board into the empty frame. Place two frame clips evenly spaced along the inside edges of the frame.  Screw each clip securely into the frame.
7. Measure equally from the top edge of the frame the sides and mark where you will place your frame hangers. This will make it easier to hang the frame level on your wall. Press or nail the sawtooth hangers into the back of the frame.

Framed Bulletin BoardDIY Inspiration Board

Stay tuned to see the rest of my office makeover coming soon!

3 Comments

Filed under DIY

Pictures of you. Pictures of me.

No matter the method of camera, film or digital, pictures just seem to stack up.  Whether they be in boxes in your closet or files on your computer, pictures rarely get the opportunity to grace the pages of a photo album. So I am here today to give you a call to action: do something about it! Whether you are in for a longer, more timely and hands-on project or a quick, clean, computer-based activity, I have some options that will allow you to check this elephant of a project off of your never-ending to-do list.

The question for you is: Traditional Scrapbook or Digital Scrapbook? I’ve recently traveled down both roads and enjoy either option for different reasons. Here are some differences and helpful hints to help you give your memories the showcasing they deserve.

Traditional Scrapbook

I am not going to claim to be a scrapbooking queen. I am sure there exist many-a-blog on the subject alone. So I am here to tell you that you don’t need to be an expert to create a wonderful handmade scrapbook. Before the birth of my son and in the midst of a nesting frenzy, I dusted off a college scrapbook that lay dormant in my closet for five years. I figured it was time to finish it or it would never get done.

Instead of doing your traditional chronological scrapbook, I created what is called an ABC scrapbook. Twenty-seven spreads, in alpha order, with subjects pertaining to whatever it is you are scrapping about. For example, “A” was for Advertising, “S” was for Summer and when you have already used a letter and want to get creative, “E” was for “Everybody’s Irish on St. Patrick’s Day.”

The best way to attack a monster like this one is to plan from the beginning. Lay out your pictures, write out your plan, then hit the store. There are millions of adorable background pages as well as stickers, stamps and other decor. If you are like me and have awful handwriting, don’t shy away from printing on colored paper or using letter stickers to spell out words. Also toss in things you have saved, newspaper clippings, concert tickets, napkins and coasters, etc. These make your book have that extra personal touch that a digital scrapbook has a hard time doing.

My college scrapbook is the only full-on book I have ever put together, but I have received two as a gift from my sister, who is exceptionally talented in the “scrapping” department. For my high school graduation, she put together a chronological book for me and gave it to me the morning of graduation, complete with prom pictures from two nights before.

For my bachelorette party, she asked women from all part’s of my life to make a page. This book is so special to me and I am able to see all of my special ladies’ personalities shine through as I flip through the pages.

Digital Scrapbooks

After creating my wedding album using My Publisher, I became obsessed with digital photo albums. Much of my creative talent is better suited for the computer, so I became addicted to putting books together. I received a digital camera in 2003, and therefore, have no photo albums since 2002. Something needed to change, so I organized all of the photos on my computer by year and began creating an album for each year.

With mediums such as My Publisher, Snapfish, Shutterfly and iPhoto, you are able to pick solid or different print backgrounds, type captions and create collages of pictures just by dragging and dropping. The great thing about digital photo albums? The pictures won’t fade or wrinkle. Printed right on the page, these books make great coffee table books. The covers can be colorful hardcovers or you can get a printed book cover/sleeve to go over the top, so your photo album resembles a book right out of the library.

I am currently looking into getting all of our old family photos digitally scanned so that I can make albums dating back to, well, going back quite awhile. Online services such as BritePix, offer full scanning services for as little as 19 cents/print. I think I am going to opt for a local option, so that I am able to drive and drop off the pictures myself. Once I make the books, I will make copies for my family members as well!

Whatever method you choose, you will not be disappointed in the outcome. It takes time, but it is fun once you get started!

What photo album personality are you?

3 Comments

Filed under DIY

DIY Abstract Art

In my living room was a sad wall that sat empty for three years…

…until a few weeks ago when I created my own piece of abstract art!

Latex Paint on Canvas, Jackson Pollack inspired art

Art is expensive but creating a work of art, especially a big one, had always intimidated me (hence the three years of vacant wall space). Since my house is old and the walls are plaster, I’m also really picky about what I put on my walls because I don’t want to deal with holes. Despite all that it was time to fill the void. I had kept this particular project in my mental “craft file” ever since I saw the fabulous Nathan Thomas do something similar on Bravo’s Top Design.

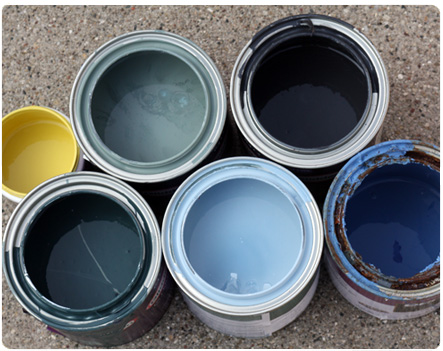
My husband and I spend a lot of time fishing on Lake Michigan, so I took inspiration from the smokey blue-green colors of the water for my palette. Using multiple quarts of latex paint, I went to town splashing and dripping the paint across a basic stretched cotton canvas.  Just call me Jackson Pollack.

abstract paint palette

Thinking about creating your own art? Go for it. Now I understand why artists feel so liberated by their work!

4 Comments

Filed under Decorate, DIY

Turning our House into a Home

I thought I’d give you all a quick update on what’s going on in my world right now.  A couple weeks ago my husband and I bought a new house.  It is a “fixer-upper” as they say and we are quite overwhelmed with the projects we have gotten ourselves into.  Below are some pictures of our new house in progress along with some of the projects we are working to complete.  Stay tuned to see some before and after pictures and lots of DIY tips!

Let’s hope, for our sake, that the after pictures are in the not-s0-distant future!

For starters, our oak floors will be refinished and the entire house will get a new coat of paint.

Our kitchen will get a face lift: new flooring, counter tops and freshly painted cabinets.

Carpet was removed from almost every room revealing some pretty awesome wood floors in some rooms!

Other rooms revealed some pretty ugly stains that will need to be taken care of.

The exterior will also need a lot of work!  New roof, new landscaping and lots and lots of paint.

It is an understatement to say that we are looking forward to the day when we will be able to sit back and enjoy our new home.  Unfortunately, I am not sure that day is in the near future.  We’ll just take it one step at a time!

What’s the next project on your list?

6 Comments

Filed under DIY