Category Archives: Decorate

Simple Solutions {Spray Paint}

One of the reasons we fell in love with our new house was the beautiful (although non-functional) Lannon Stone fireplace.  It adds so much depth and design to our living room.  When we purchased the house, it came with a gold grate and screen that just didn’t go with our decor.

I looked into purchasing a new set, however the cost was well over $100 for both.  So, I marched over to my local hardware store and picked up a can of RustOleum Oil Rubbed Bronze spray paint.

It took me just 20 minutes to give everything a few coats.

While the results are not too dramatic, they have changed the feel of our living room and definitely made it more cohesive.

All for just $7 and 20 minutes of time.  That is my kind of project!

**Remember, our fire place is not a working fire place.  If you are planning on spray painting grates and screens that you will actually use with fire, I suggest looking into another spray painting product that is fire safe once it dries.

2 Comments

Filed under DIY

Nursery Inspiration Board

Now that summer is approaching, I’ve realized it’s time almost time to get my nursery in gear! We know we’re having a little boy so we want the room to lean more masculine but I knew right away that themes like sports or trucks weren’t really for us.  Knowing that this kid will probably spend tons of time outside, I’ve been trying to put together ideas for a room that my outdoorsy husband will love too…without it turning into a Cabela’s catalog. I want it to feel soothing but bright and whimsical but not too “baby”.

Tada!  Here’s my inspiration board for our modern woodland nursery. I haven’t quite sorted out all the details yet but it’s giving me a long shopping list and multiple DIY projects to get started on!

1. Birch Stencil, 2. Stag Pillow, 3. Orange Alpaca Throw, 4. Owl Lamp, 5. Natural Tree Stump Side Table, 6. Polar Bear Rug , 7. Harper Crib Bedding, Classic Sage Crib Bedding, 8. DIY Bird Mobile

9 Comments

Filed under Decorate

{DIY} Rustic Monogrammed Wreath

Perhaps you can blame the lingering cool weather on me. Up until this week, I had yet to take my winter wreath off of my front door. This was mostly because I didn’t have anything to replace it with. So with a little trip to JoAnn, I bought a few materials for less than $15 that will take my front door through the warmer months.

I still incorporated the yarn that I loved from my winter wreath, but added more of a rustic element using a sage colored burlap. Super easy!

What you need:
1 yard of burlap
1 12 inch foam wreath form
1 package of yarn
1 wooden letter
chipboard letters
straight pins

1. Start by cutting a few strips of burlap, about 3-4 inches thick.

2. Wrap the burlap around the wreath form, holding it in place with a few stick pins as you pull it tightly around the form.

3. Wrap yarn around the wooden letter. Depending on the shape, this can be tricky in spots (like the bottoms of the W) but you should be able to move the yarn around to cover up any open spots.

4. Put 2-3 stick pins through the yarn on the back of the letter and insert the pins into the form.

5. Wrap yarn around the wreath form until you are pleased with look.

6. Using chipboard letters, spell out your last name and affix letters to the wreath using a small dab of Krazy Glue.

7. Either hang the wreath on a door hanger, straight to a nail, or twist a little floral wire into a loop and affix it to the back of the wreath with a pin.

Here’s to warmer days!

2 Comments

Filed under Decorate, DIY

{Retail Replicate} Burlap Message Board

I saw this Burlap Message Board in the Ballard Designs catalog last month and fell in love.  It was perfect for my entryway, although the $79.00 price tag was a little steep.

After spending some time poking around my local craft store, I decided to try and replicate this message board using a method I saw the amazing Kate do on her blog Centsational girl.  She used a painters canvas to create an inspiration board for her office and I thought I might be able to use that same method for this project.


The message board turned out great and the best part was it only cost me about $20!

Here’s what you need:

Painters canvas, any size
squares of cork board
glue
burlap or any other fabric – I used fabric that was 100% cotton, but had a burlap look and feel
upholstery tacks
staple gun
hammer

First, you want to  glue the cork board to the back of your canvas.  Start by placing a thin layer of glue on the back of your board.

Secure the cork to the back of the canvas, cutting the pieces so that they fit into the back, being sure to slide it under the wood bar that goes down the middle.  Smooth out each piece as you go.

When you are finished, it will look like this.

Next, Cut your fabric so you have a couple extra inches on each side to wrap around the frame.  Iron out any creases that exist.  Lay the fabric down on a flat surface and place the canvas on top.  Pull up one side at a time and staple all around the edges so that the fabric lays flat.

Once you have secured your fabric, measure out how far apart you would like your upholstery tacks and nail the tacks down with a hammer.

Finally, attach D Ring Hangers to the back for hanging.

The message board turned out great and it looks perfect in my entryway.

8 Comments

Filed under Decorate, DIY

Office/Guest Room Makeover

I never really liked the old “office” in our house.  With a mish-mash of clunky inherited furniture and drab green walls, it was never a place that I really wanted to work.  Now, with a baby on the way the old office is soon to become the nursery, which means the guest room has to serve a dual purpose. It was the perfect opportunity to create a space that was both functional and inspiring to work in.

BEFORE
When we bought our house, the guest bedroom was a buttery baby yellow. It was fine but not very sophisticated so the first step was to repaint.

AFTER
I swapped out the yellow for a calming grey on the walls, leaving all the moldings and trim bright white. Since I had already refinished the dresser and bed frame in a sleek black, the rest of the room started to take on a black, white and grey scheme with pops of yellow and gold for personality.  The gilded mirror is vintage. The flowers are dried cock’s comb from last year’s farmers market.

Besides repainting, I also rearranged the placement of the bed in the room.  Originally we had the head board placed against the other wall (right wall of this photo) so you could easily make the bed.  However, that would have left no space in the room for a desk.  By just rotating the bed and positioning it against the wall, it created enough space for a desk and chair, plus a much better flow for the room.

The same day I scored the gilded mirror, I found this awesome 1950s yellow chair at a different antique store.  The moment I laid eyes on it, I had to have it and at just $30 it was a steal of a deal.  The pillow cover is from The Home Centric on Etsy.

Since the room is not huge, I chose the slim, modern Parsons desk from West Elm and surrounded it with things that will inspire me while I work or blog, like my DIY idea board, fresh flowers and scented candles.  Every day supplies like pens and scissors look decidedly more chic in a vintage milk glass vase.


The closet got a major overhaul, organizing gift wrap and craft accessories into various storage bins, bags and shoe boxes. Reducing the extra clutter makes it much easier to find the items I need and make notes when I run out of supplies.


The final project will be to frame a very large world map for the large wall above the bed. Since framing something that large costs a fortune, I’m currently scheming ideas for a DIY framing project. Stay tuned!

12 Comments

Filed under Decorate

Creating an Eclectic Gallery Wall

I’ve been working on a gallery wall for our master bedroom for nearly a year now. That’s a long time and way longer than necessary but ending up with a wall of pieces that I love was worth the time. Like most gallery walls, it started with a piece of artwork or two that were great on their own but had no real place in our house. Since our master bedroom has a very large wall it was the ideal spot to get started with these prints.

The beauty of gallery walls is that you can do them a billion different ways, mixing and matching frame shapes & sizes or sticking with a consistent style. I wanted a mix of new and vintage frames for a look that seemed to be acquired over time (which it turned out to be!) but was unified by color. I spray painted two intricate empty frames found at flea markets and an old frame of my husband’s with white spray paint to use as my large foundation pieces.

empty white picture frame
The three empty frames didn’t have glass or backings so I bought framing glass at Michael’s. You can ask the framing counter there to cut glass down to size for you as needed for a nominal fee. Since no one will see the backs of the frames you don’t have to spend the money to professionally back them. I just attached a hanging hook and 1/8″ offset clips to keep the cardboard and glass backing in place. I’d recommend affixing these items while the frame is empty so you don’t break the glass when you apply pressure….which I may or may not have done!


Once you have all your pieces, try a test arrangement before you start banging holes into your wall. Somewhere in the past I had seen someone suggest mocking up a gallery with paper before you start. I traced the outside of each of my frames onto plain kraft paper and played with arrangements on the wall until I found the right placement and then left it up for awhile to be sure I liked it.

prepping a gallery wall
Finally, we hung them! Be sure to use a level when you’re hanging since it can be really obvious if something is off when you have multiple pieces that are straight.

7 Comments

Filed under Decorate

Sew Sweet Valentines

Making valentines is one of those project that immediately brings you back to your childhood or spending time with your children. Lately I’ve been smitten by things featuring stitched details so I thought it would be fun to recreate that youthful feeling by making valentines with this charming theme. So a few weeks ago my mom and I spent an afternoon chatting and stitching away – she showing me the best ways to machine sew while I stitched along by hand.

This project takes time but if you’ve got an afternoon to chat with friends or family as you sew, you’ll hardly notice!

What You’ll Need:
package of small cards & envelopes
OR
plain cardstock cut to size for separate envelopes

a variety of colored cardstocks or scrapbooking papers
1-2 pieces of scrap paper
glue stick or rubber cement
all purpose thread
needle and/or sewing machine
embellishments of choice – ie. sequins, ribbon, twine

1. If you’ll be using cardstock, start by cutting your cardstock down to fit in the envelope. I swapped the cheap-o cards I bought for cardstock and trimmed them to 5×7 size to fit as 3 1/2×5″ cards in the envelopes using a small paper cutter.
2. Create your heart shaped tracing templates by folding a piece of scrap paper in half and cutting out hearts in various sizes. Unfold each heart and examine it. Refold and trim to adjust the shape as desired. The templates allow you to get symmetrical shapes without having folds in the “good” hearts you’ll use for your cards.


3. Next, use your templates to trace a number of “good” hearts on your colored cardstock and scrapbooking papers. Trace on the opposite side of the paper as what you will want showing on the card. Cut out hearts. You should be able to cut 2 hearts for each one you trace by stacking up paper and cutting through both to save time.
4. Glue the hearts onto the folded cards in a variety of designs (exception: sequined heart – see below).

For Machine Sewn Cards:
Use a pencil to lightly trace a word, swirl or lines on the card. Open card flat and use a needle and thread to hand-stitch over your design or a sewing machine with a zig zag stitch to slowly sew over the design. With the sewing machine, work slowly, turning the paper to achieve smooth curves. As you finish the design, pull the threads through to the inside of the card. Snip them and knot them several times to secure in place. Gently erase pencil marks.

For Hand Sewn and Sequined Cards:
For the sequined card, lightly trace a large heart template on the inside of the front of the card. Knot your sewing or embroidery thread and poke the needle from the backside of the card through the bottom point of the heart. String on a sequin. Hold the card up to the light to find your pencil outline and poke back through in a small running stitch. Repeat. Don’t worry if the stitches are imperfect…it’s part of the charm!

I recently discovered that my blog friend, Nikki (who can sew me under the table) was on the same wavelength this year. Check out her blog, Nikki, In Stitches for more handsewn valentine ideas!

7 Comments

Filed under DIY

Budget Friendly Bedroom Makeover

Eight months ago, we moved into our new house and frantically began trying to get each room set up and feeling like home. In the process, I seemed to neglect one very important room: our bedroom.  The room needed some major design love.  But with a tight budget and not a lot of time on my hands, I didn’t have many options for sprucing it up.

Enter Carmol-Transformed Interiors. Two fabulous ladies named Caroline and Molly in the interior redesign world who give you a home-sweet-home affordable. Their redesign recipe combines the items you already own with a few new pieces to up the “flavor factor.” They told me they could give me a bedroom makeover in one day for just $100 dollars. I was skeptical. Challenge accepted.

Fast forward to my room reveal as Caroline and Molly flung open my bedroom door. I saw a room I almost didn’t recognize. It felt homey, warm and inviting. I couldn’t have been happier and all for just $100!

Here are some of the new details that were added to the room:

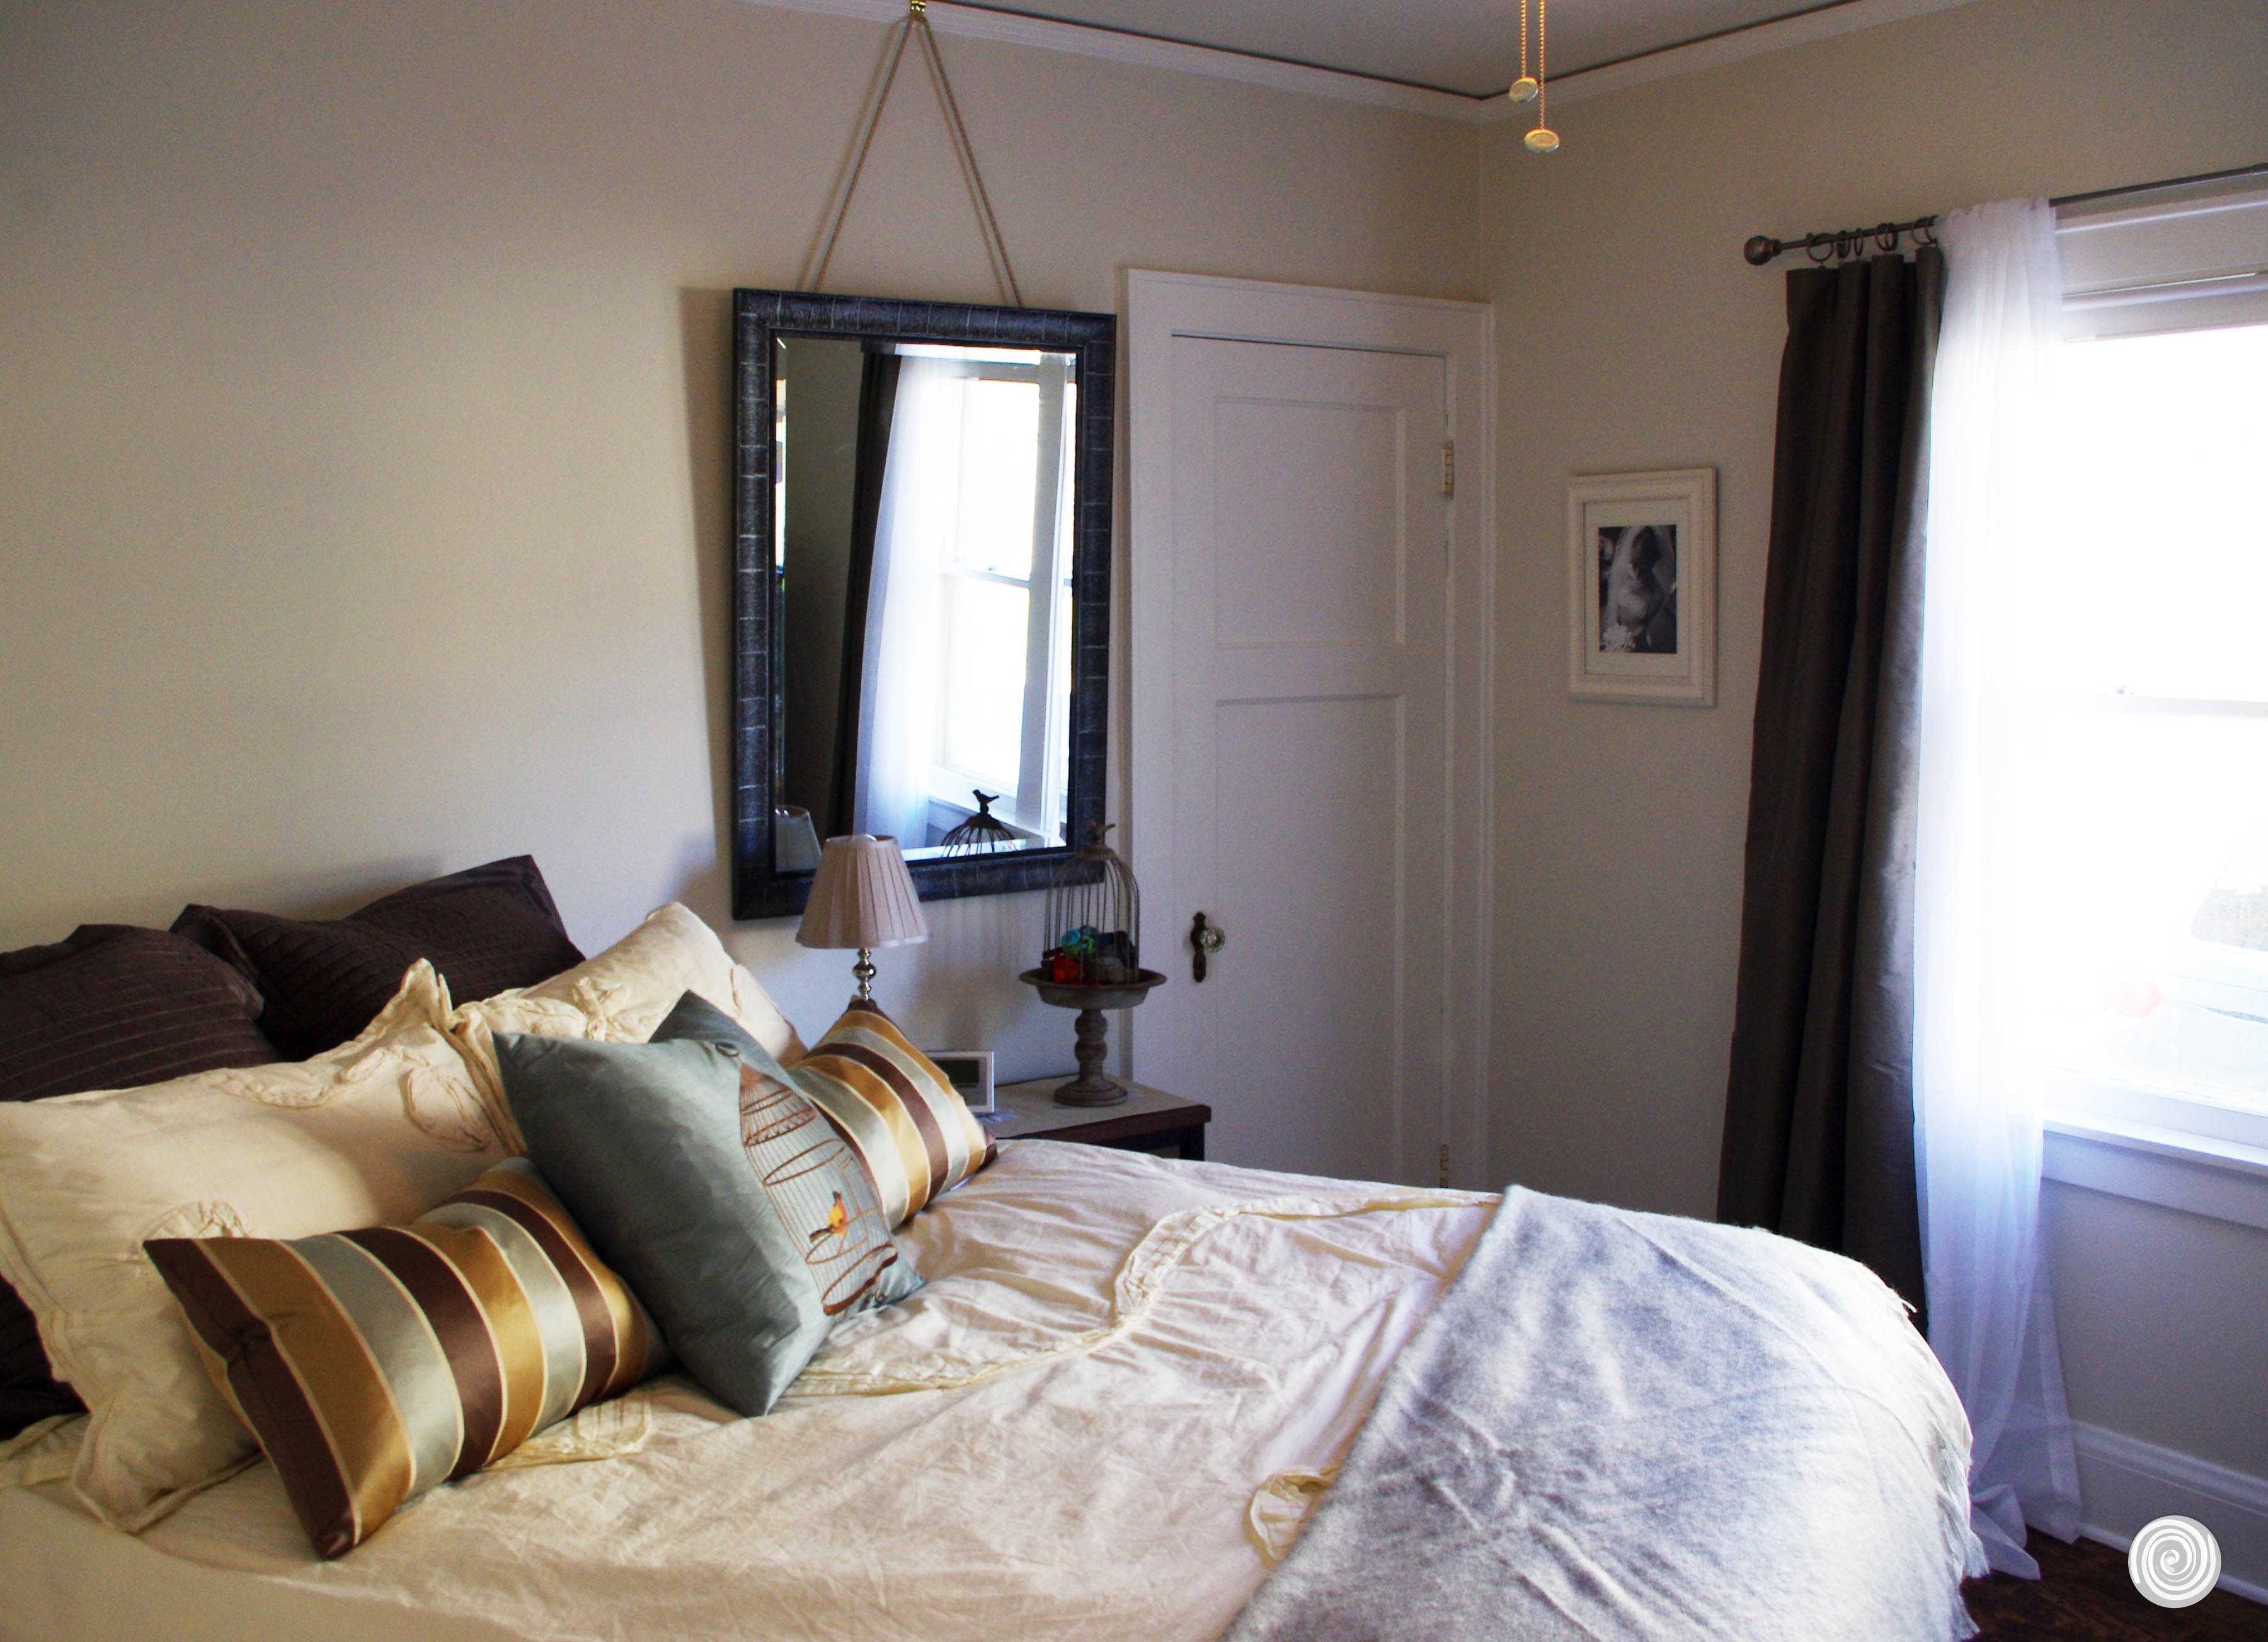
Throw Pillows and Throw – They repositioned my bed on an angle which increased floor space and added visual interest in the room. The addition of throw pillows and the throw dressed up the bed and really made it the focal point of the room.

Night Stand Runner – Pushing our 2 small nightstands together created the illusion of a larger piece of furniture and a fabric remnant was placed on top as a runner that tied in the colors of the room.

Mirror – A large mirror was hung with some decorative rope and hooked to the top of our picture ledge, right above the night stand. This gave the allusion of a much larger room. (Carmol’s Budget Friendly Tip: The ladies actually found an inexpensive brown mirror and brushed it with silver paint to give it a more high-end look!)

Window Sheers – The addition of inexpensive window sheers soften the look and diffuse light for a more romantic master bedroom.

Colorful Vases with Branches – The decorative bottles were the perfect color for the room and the branches added a great organic (and free!) addition.

Antique Tabletop Mirror – The mirror was placed on the dresser and acts as a catchall for change, jewelry, and other special keepsakes.

Along with many new items, Carmol was also able to use other items I had laying around my house. One reason I love Carmol is they promote shopping in your own house – who knew moving an object from one room to another would make it feel new!

Here are a few more creative additions that are new to the room, but cost us nothing!

3 Gray Decorative Frames – These frames have been sitting in my front hall closet since we moved because I loved them, but didn’t know what to do with them. Carmol made them feel right at home in my bedroom.

Vintage Birdcage – This had been in my dining room, although it didn’t really fit in. Move it to the bedroom and it is one of my favorite decorative pieces.

Framed wedding picture – This was a Christmas gift from my husband after we were married, and I love that it now hangs in our bedroom.

All in all, the room has a brand new feel and it is so “us.” The ladies of Carmol were able to pinpoint my personal style exactly and perfectly pulled off a room redo in a day and with only $100.

Tips for redoing a room with just $100:

Shop, Shop, Shop. You will need to visit many different stores to compare prices, find the best merchandise and really find stuff you love. Shops like Marshalls, TJ Maxx and Tuesday Mornings always have great finds. But don’t forget to check out your local antique store or GoodWill. You never know what you might find!
Get Creative. Found the perfect picture frame, but it isn’t quite the right color? Paint it! Painting an object can give it a whole new look and feel.
Shop within your own house. Moving decorative objects around your home makes old spaces feel like new. Those throw pillows that are starting to look old on your sofa might just be perfect for your bedroom!

For more information on Carmol-Transformed Interiors and to see more of their exciting room makeovers, visit them on Facebook.

2 Comments

Filed under Decorate

Creating a Writer’s Nook

My new year’s resolution: finish the novel.

I have a near complete novel that I’ve slowly been editing for over a year now. 2010 was supposed to end with a finished product, but the little bugger took up most of the year…and I am okay with that. So this year, I have one goal. Finish the novel. Amongst the chaos of brightly colored pieces of plastic that make unbearably loud noises, I decided I needed a little inspiration corner. A small space where I could clear my head and write.

I used to work from home, but my office was made over into a nursery. My desk and office supplies were moved to the basement and have been haphazardly piled over the past year. Slightly embarrassing to share, but I take comfort in knowing with near certainty that I am not the only one with a space like this one.

To be able to clear my head, I first needed to clear this space. Some things were put in storage, some were filed and many were thrown away. I cleared the desk leaving only a few things, leaving plenty of room to spread out if need be.

I moved the desk to the other side of the wall and angled it, creating a more private space. A soft bamboo throw covers the chair, along with a nice warm cup of coffee from my new Keurig coffee maker (sidebar: I love k-cups! Get one.)

A few writer’s tools: a dictionary, a baby name book and The Artist’s Way by Julie Cameron. A fresh vase of flowers lightens the dark basement mood as well as a winter scented candle. An iPod docking station can play some of my favorite writing music like Josh Groban (don’t judge me) and Death Cab for Cutie.

I used a cork and marker board to serve as inspiration boards and planning tools. I hung a favorite picture from my high school photo class and a few newspaper clippings, along with some other fun finishes.

And there it sits, the first draft with lots of scratches and notes. I look forward to tackling this big and exciting project this year and hope that 2011 concludes with a completed product!

Try creating a quiet corner in your house for whatever it is that lights your fire. No plastic noisemakers aloud.

8 Comments

Filed under Decorate

Best Haute Posts of 2010

2010, what a great year it’s been! We are so grateful to have shared this past year with you. We’ve learned so much and plan to use that knowledge to bring you bigger, better ideas in 2011.

So to bid 2010 adieu, we thought we would leave your (and our) favorites:

Top 10 Posts of 2010

10. Babies, babies, babies! With the arrival of Lincoln James this year, Stef was lucky enough to experience these two fabulous baby showers: Lions and Tigers and Bears, Oh My! and the Bird’s Nest Baby Shower

9. Two words: goat cheese. Mix it up with Anne’s Goat Cheese, Apple and Pine Nut Pizza.

8. No need to spend mega bucks buying a wreath for your door. Katie’s Fall Berry Wreath or Stef’s Winter Sweater Wreath provide a great look on the cheap.

7. Who knew brussel sprouts were so hot right now? Braised Brussel Sprouts with Bacon.

6. Kiddos love the Pink and Brown Ladybug Party and the Campfire Birthday Party.

5. Apparently everyone is asking at parties around the country: Have you tried the grape salad?

4. Move over Pottery Barn. DIY Moss Topiary for a fraction of the cost.

3. Wedding bells took over June on Haute Apple Pie with a Naughty and Nice Bachelorette Party and a Summertime Lemonade Shower.

2. As featured with our friends over at Foodpress.com: Chicken and Black Bean Chili

1. We have some eager to learn readers. Katie’s How to: Refinish a Dresser and Anne’s How to: Painting Kitchen Cabinets (as seen on Freshly Pressed) were a big hit!

3 Comments

Filed under Cook, DIY, Entertain